Current Works Guide Service
  • (231) 883-8156
  • ted@current-works.com
  • Book a trip
  • Subscribe to Newsletter
  • Home
  • Guide Trips & More
    • Guide Trips & Pricing
    • Casting Lessons
    • Gift Certificates
    • Book a Trip
  • Fishing Report
  • Fish & Seasons
    • Steelhead
    • Trout
    • Smallmouth Bass
    • Salmon
    • Bluegill / Panfish / Bass
    • Golden Bones / Carp
  • Rivers & Hatches
    • Upper Manistee River
    • Lower Manistee River
    • Betsie River
    • Boardman River
    • Hatch Chart
  • Fly Tying
  • Articles
  • Gallery
  • About
    • About Your Guide
    • Testimonials
    • Newsletter
    • Area Information

Fly Tying

Tilt-Shoot Iso – Isonychia Fly Pattern

Posted by Ted Kraimer - June 14, 2013
Tilt Shoot Iso Isonychia Fly Pattern

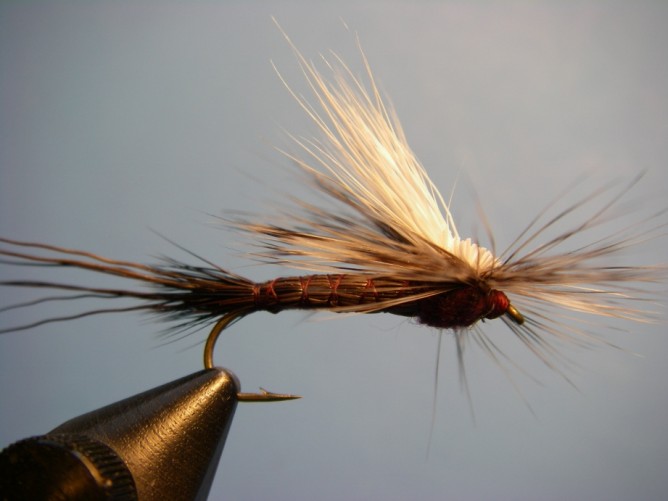
Ted’s Tilt Shoot Iso

While the “hex” mayfly gets the bulk of praise and attention from Michigan anglers, there is another mayfly that gets my praise. The Isonychia emerges over a longer period of time, is easier to cast, and doesn’t wait until dark to show – what’s not to like? Having a number of names Iso, Slate Drake, White Gloved Howdy, Maroon Dun among others, it should be thought of as important and should be found in any Michigan trout angler’s fly box from June through September.

There are two genus of the Isonychia (Salderi and Bicolor) which inhabit many of our local rivers. Each have different characteristics. Rather than give you a taxonomical description or bore you with entomology, let me provide you with the brass tacks:

Tilt-Shoot-Iso-Isonychia-Natural-Iso-Spinner.jpg

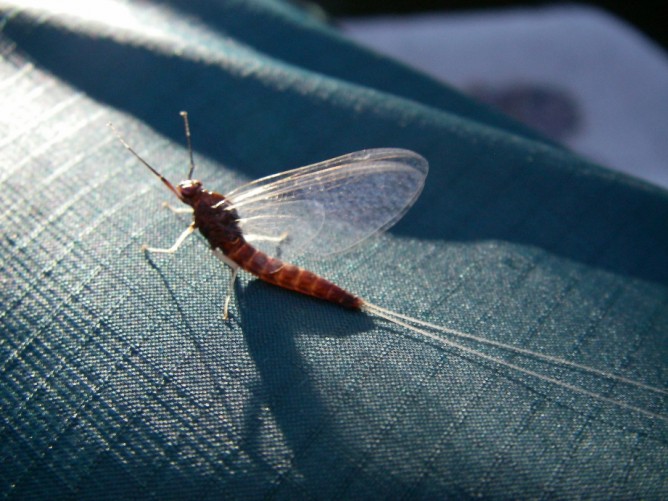
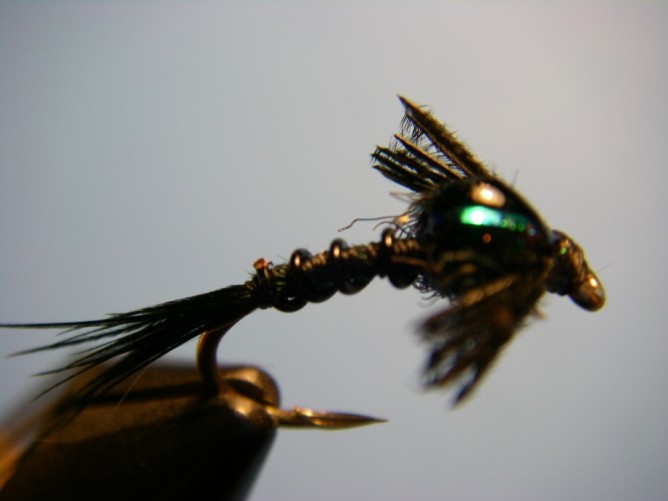
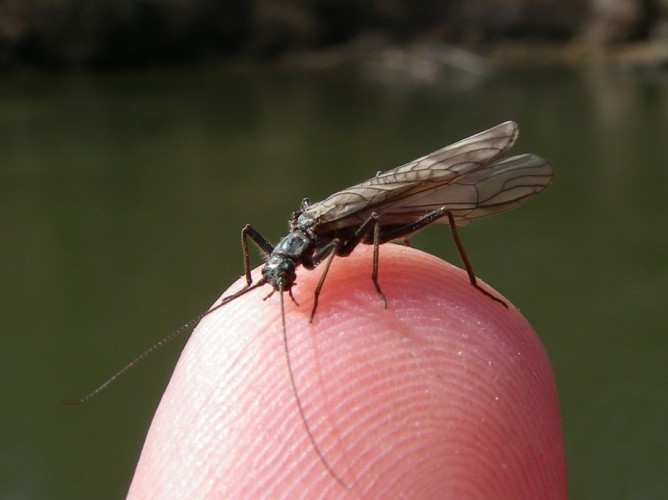
Natural Isonychia Spinner

The nymphs love swift water in gravel sections, adults/duns range in size with the most common being 10-14, adults/duns bodies vary in color between the two genus and the particular river (from a light creamy olive, to tan, to a brown-mahogany color), Adults/duns have deep dun colored wings where spinners have dark maroon bodies with clear wings, and both duns and spinner have distinct white front legs making them easy to identify. The largest concentration and emergence is in June extending through mid-September with the first insects large in size and tend to get smaller through that time period.

The duns typically emerge in the evening, but they can be found on the water at almost all times of the day, especially in the later months and when cloud cover is present.  Spinners, too, typically congregate in swarms in the evening before they fall to the water’s edge to drop eggs in riffle sections of rivers. For years it was thought that Iso nymphs only climb onto shore before emerging, but it is now accepted that they emerge in mid-stream as well – trout have known that for years.

Tilt Shoot Iso Isonychia Brown Trout

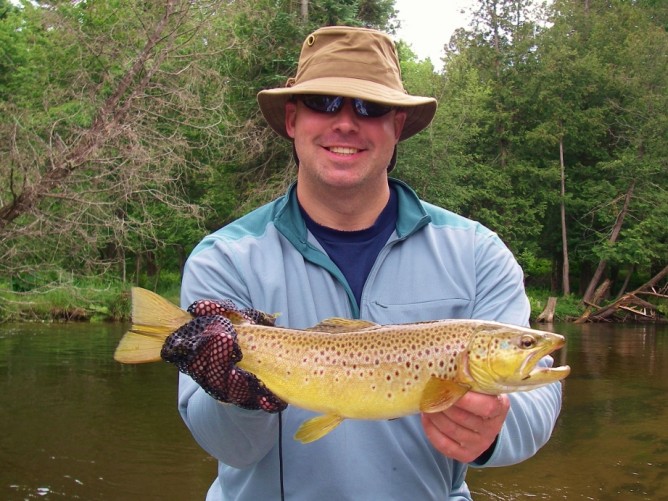
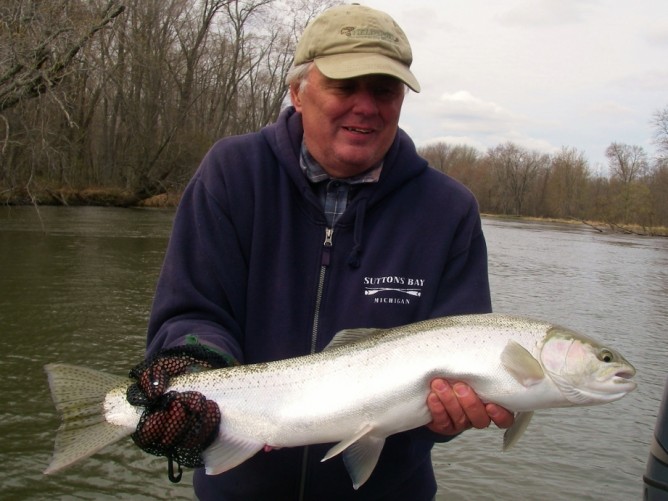
Brown Trout caught on a Tilt-Shoot Iso

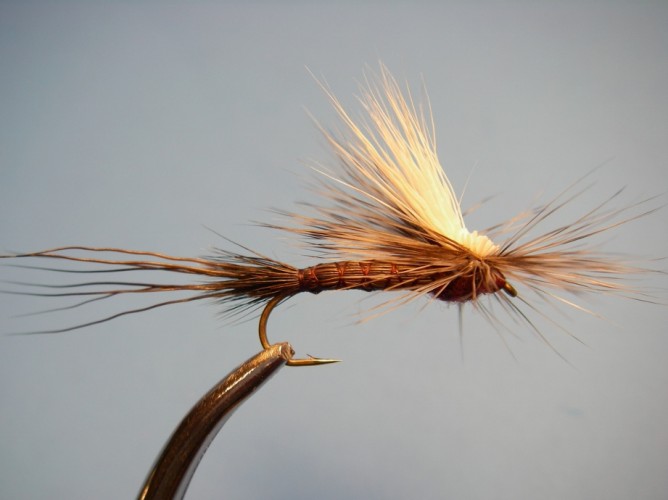
The Tilt-Shoot Iso is a pattern I created and have been using the past 10 years with great success.  While it isn’t the easiest fly to tie for those unfamiliar with hair body patterns, you will find vast improvements after a number of attempts.

This version of a parachute provides a realistic silhouette of the wing while the pattern sits low in the water for fish to easily see — important when fishing broken water. You can change the body color by changing the thread color to tan or olive, and its worth tying some with a more natural gray color wing/post. Tie this pattern in smaller sizes and you will find it will work as an imitation for a number of mayfly spinners.

Ted’s Tilt-Shoot Iso is available from Rainy’s Flies and can be bought in stocking fly shops. Below are tying instructions for you fly tiers.

Tilt Shoot Iso Isonychia - Step 0

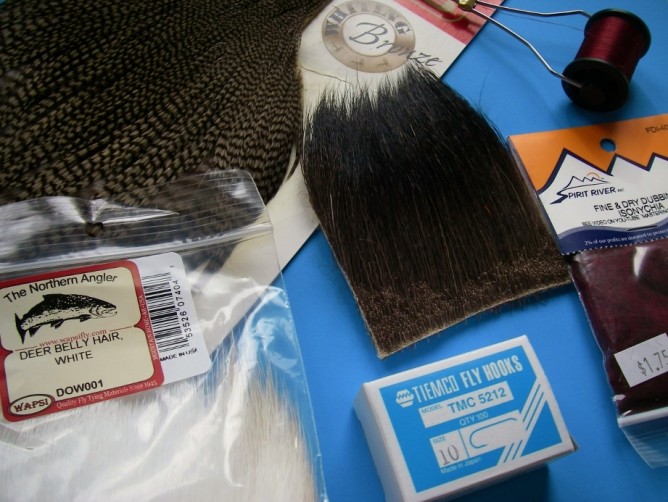
Tilt-Shoot Iso Recipe

Hook:             TMC 5212 10 – 14
Thread:          Uni-6/0  Wine
Tail:                Moose Body
Body:              Moose Body
Post:               Deer Belly Hair – White
Hackle:           Grizzly Dyed Dun
Thorax:          Fine & Dry Dubbing – Isonychia
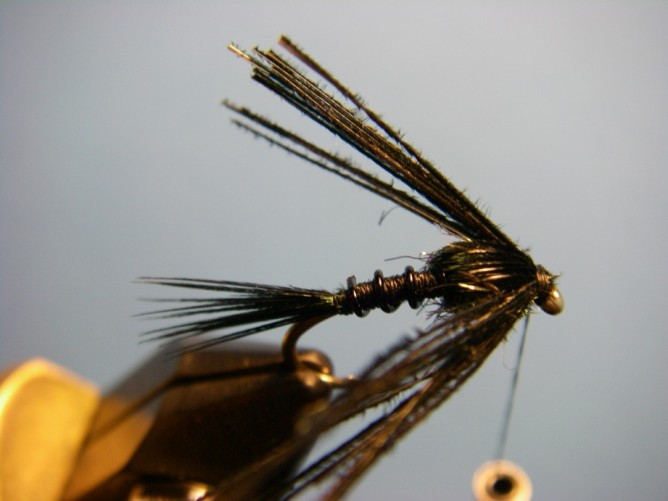
Tying Instructions

Tilt Shoot Iso Isonychia - Step 1
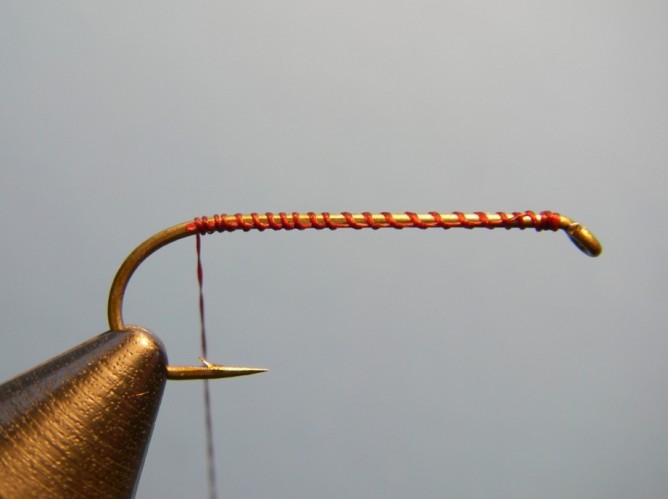
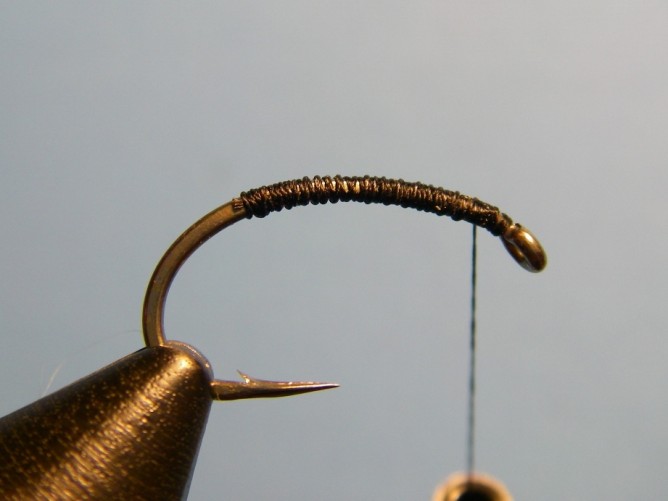
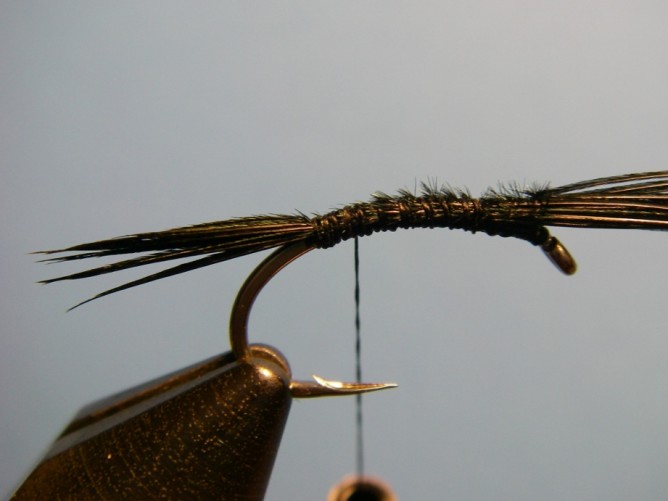
Step 1.
Place hook (size 10) in vise and wrap a thread base from behind the eye to above the barb.

Tilt Shoot Iso Isonychia - Step 2
Step 2. Cut 6 – 8 moose body hairs, clean and stack/even them and tie in on top of the hook about
one hook gape’s distance behind the eye.  Tie down along the shank to above the hook barb and back again.

Tilt Shoot Iso Isonychia - Step 3
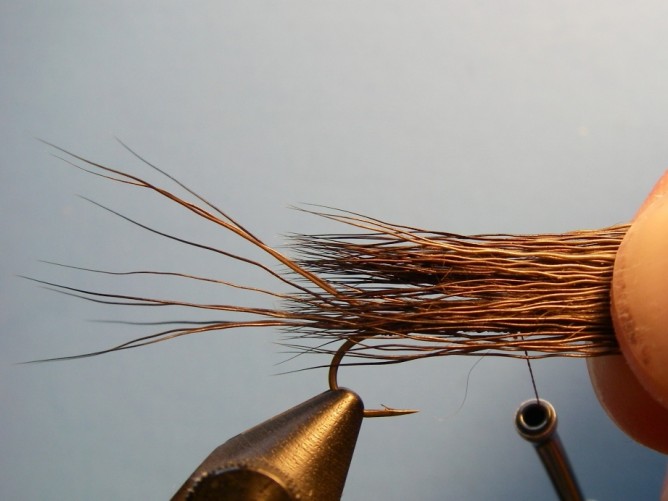
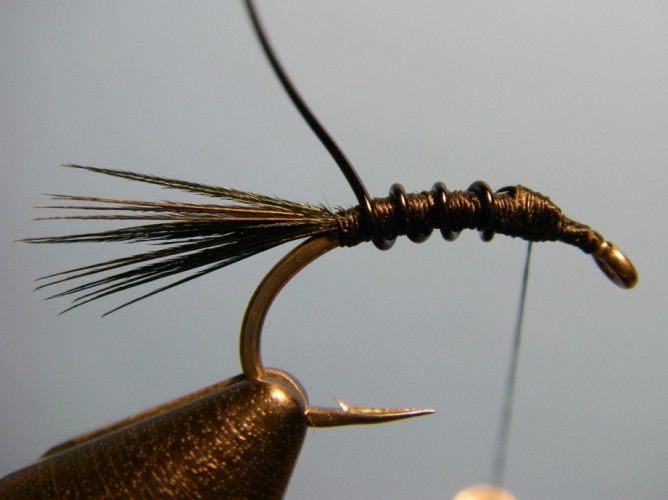
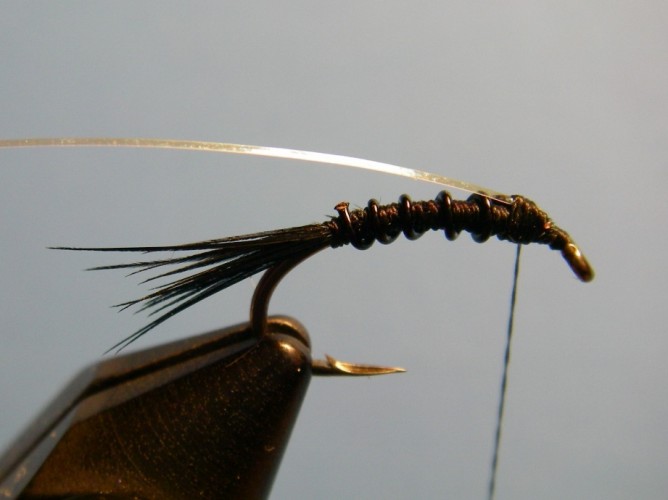
Step 3. Cut a large clump of moose body hair (approx. the thickness of two wooden match sticks), clean and stack/even. Measure the hair by laying the clump along the hook where the tips extend just beyond the hook shank. Trim the butt ends so the body will extend from the where we tied the tail in to just beyond the shank.

Tilt Shoot Iso Isonychia - Step 4
Step 4. Lay the clump of moose along the hook making sure it completely surrounds the hook
shank for complete coverage. After a few wraps to secure it in place, hold the moose taught with your
left hand as you wrap the thread towards the hook bend with the bobbin in your right hand.

Tilt Shoot Iso Isonychia - Step 5
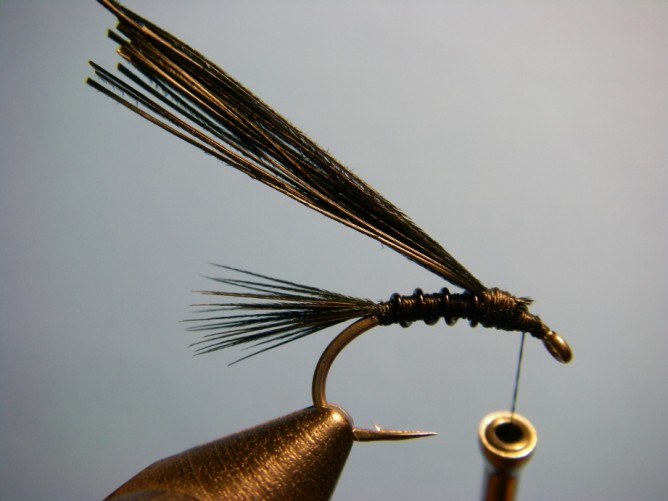
Step 5.
Take the thread wraps to above the barb and make two tight wraps to secure
and then wrap the thread back toward the hook eye crisscrossing the thread
wraps making an X pattern. Once secured, trim off any excess butt material.

Tilt Shoot Iso Isonychia - Step 6.5Tilt Shoot Iso Isonychia - Step 6

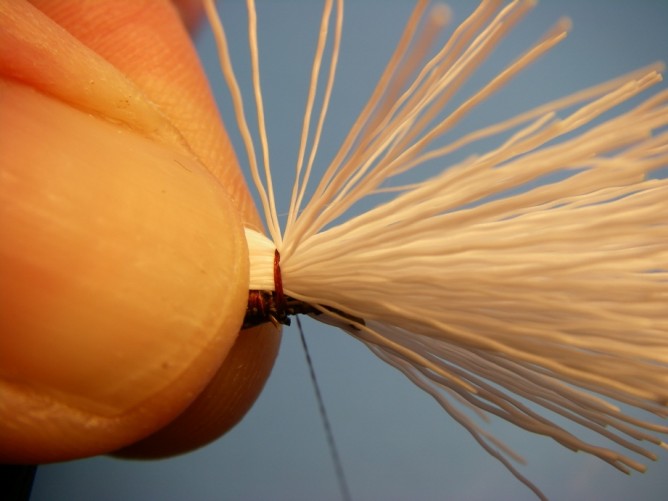
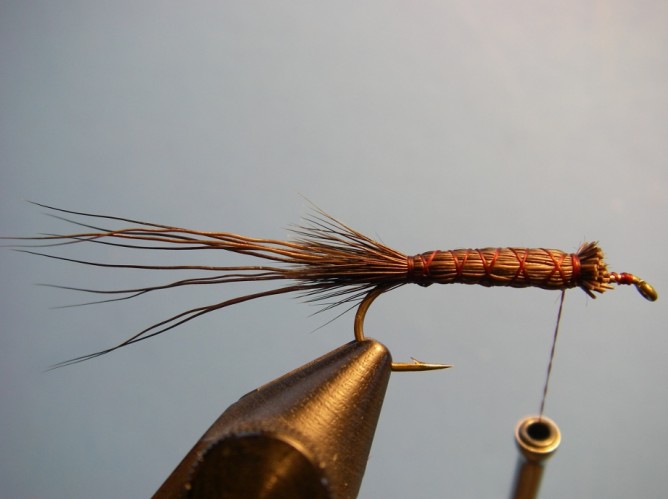
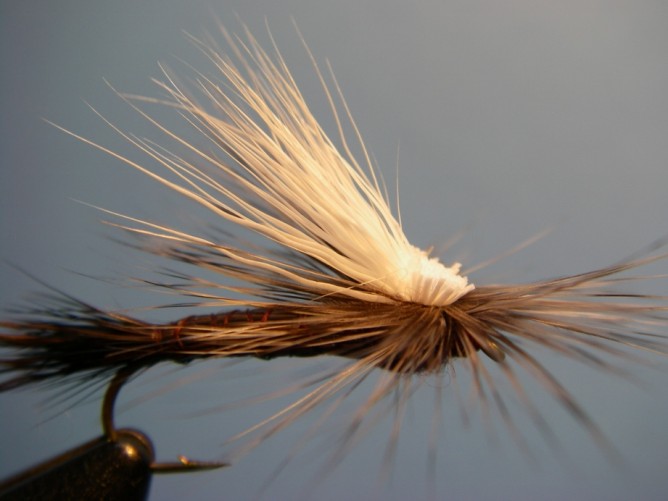
Step 6. Select a clump of deer belly hair for the post/wing (approximately the thickness of three match sticks). Clean and stack/even it.  Lay the hair on top of the hook so the natural points extend to the end of the body.
Tie in the post/wing where the moose body ends and do not trim the butt ends of the hair.
Because the hair is hollow it can easily be cut by too much thread pressure.

Tilt Shoot Iso Isonychia - Step 7
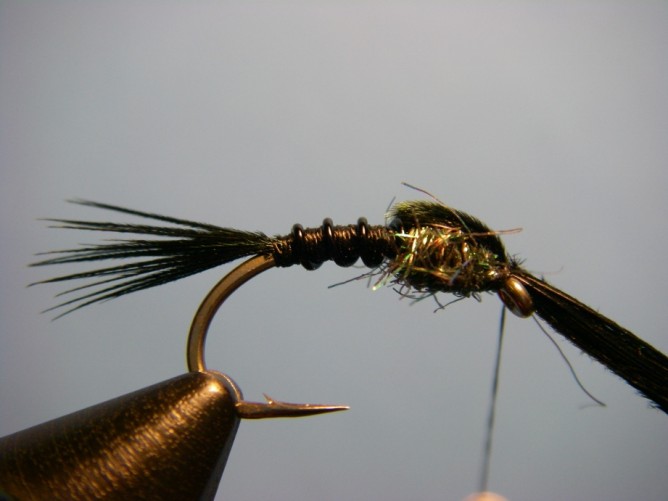
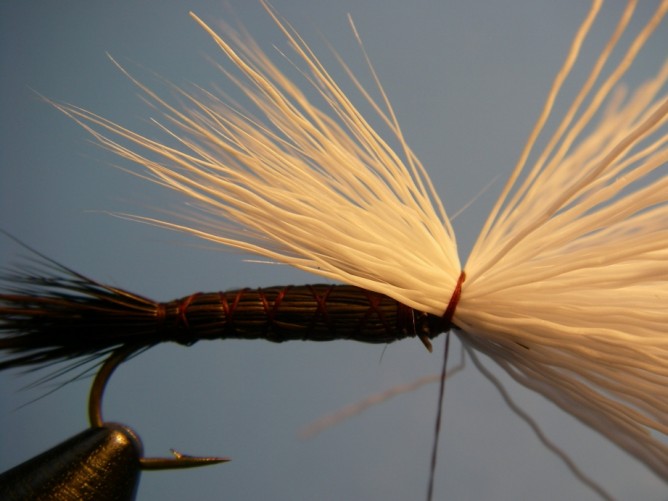
Step 7. Pull both the tips and the butts up and wrap along the shank to encourage the hair to move upward. Tie in a hackle feather at the base of the post/wing with the dull side of the feather facing you. The feather, after being wrapped, should extend to the end of the X-wraps on the body.

Tilt Shoot Iso Isonychia - Step 8
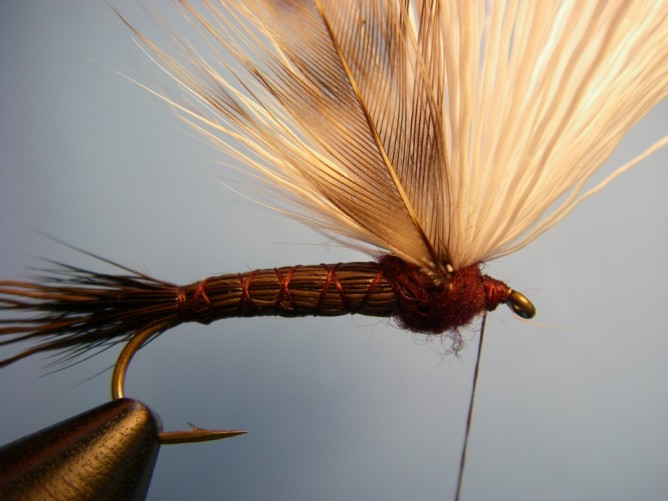
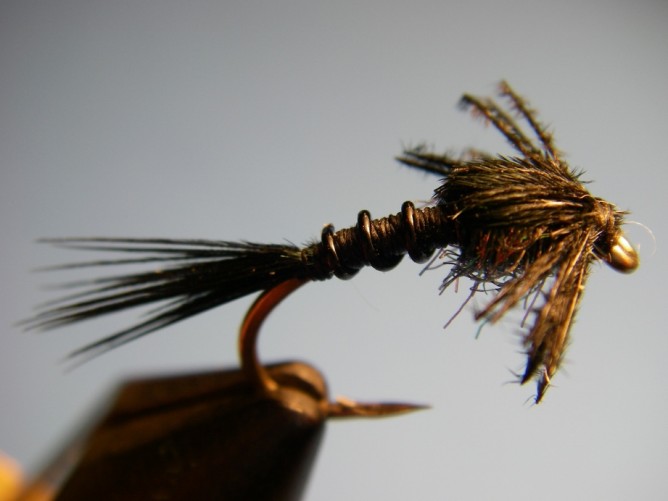
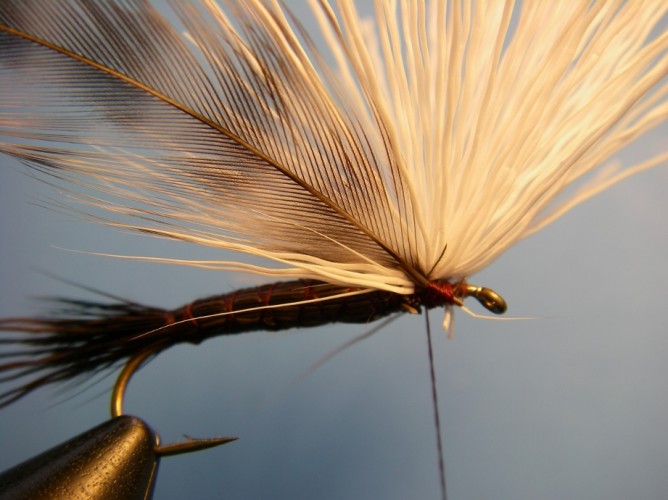
Step 8. Dub a tight thorax on both sides of the post/wing that is slightly
thicker than the body/abdomen also encouraging the post/wing upward.

Tilt Shoot Iso Isonychia - Step 9Tilt Shoot Iso Isonychia - Step 9.5

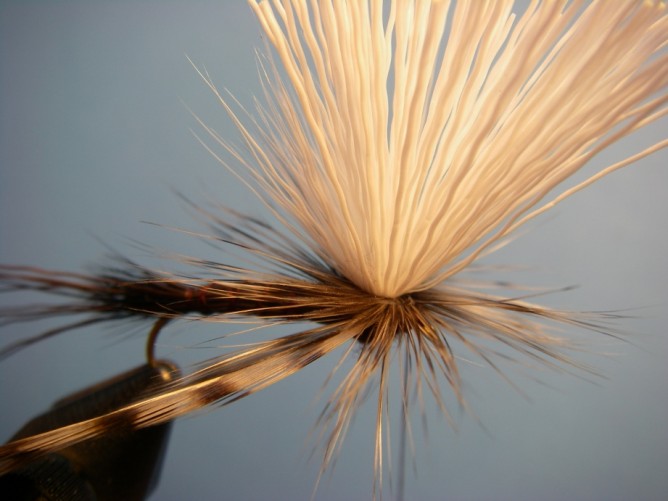
Step 9.
Wrap the hackle parachute style under both the tips and butts of the post/wing.
Wrap the hackle firmly and it will compress and seat nicely against the post
creating a durable hackling. Tie off between the hook eye and dubbing.

Tilt Shoot Iso Isonychia - Step 10Tilt Shoot Iso Isonychia - Step 10.5

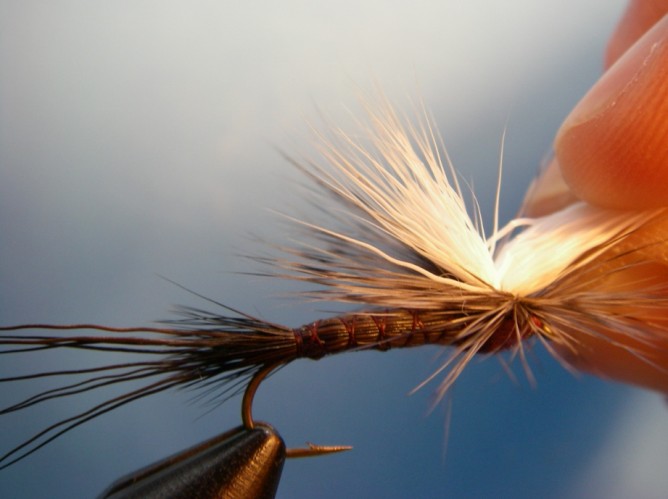
Step 10.
Pull the butt ends of the wing/post forward and trim only the
butts close to the base, just above the hackle.

Tilt Shoot Iso Isonychia - Step 11Tilt Shoot Iso Isonychia - Step 11.5

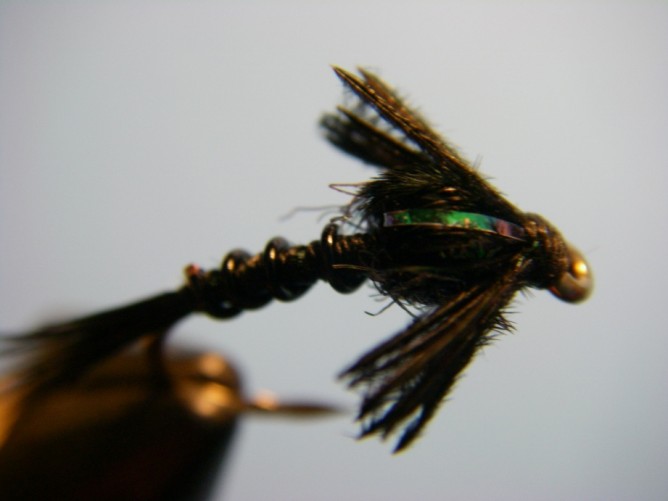
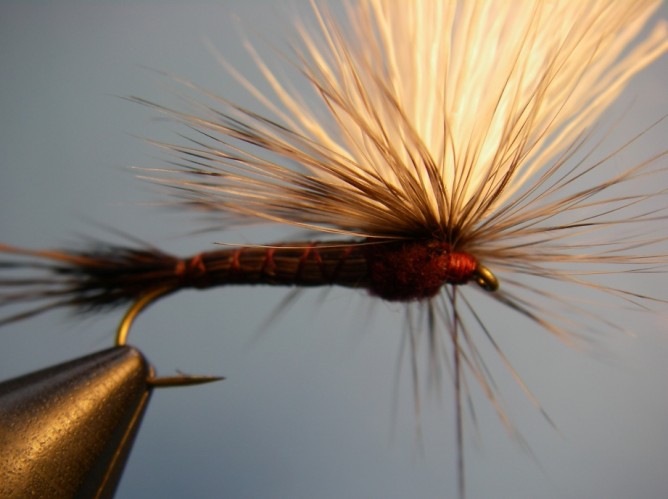
Step 11. Apply a drop of thin head cement at the base of the post and the thread head.

Tilt Shoot Iso Isonychia Fly Pattern

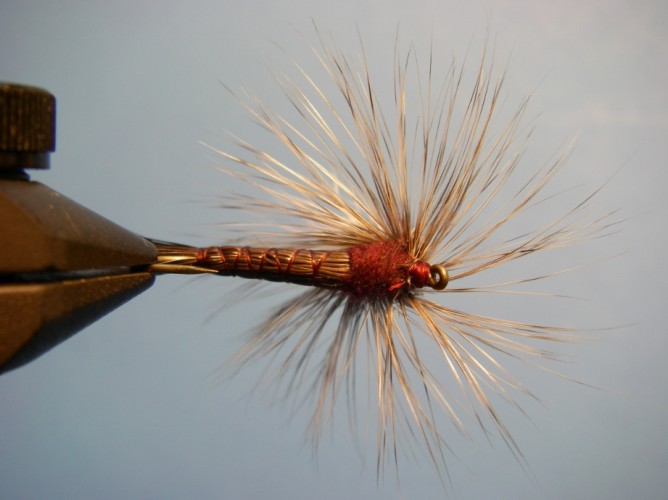
Finished Tilt-Shoot Iso Isonychia fly pattern

dry fly, how to tie, iso, isonychia, isonychia bicolor, isonychia fly pattern, isonychia salderi, michigan, rainys, slate drake, tilt-shoot Iso, white gloved howdy

Early Black Stonefly Nymph Pattern

Posted by Ted Kraimer - March 17, 2013
Early Black Stonefly Nymph

Ted’s Early Black Stone

Small black stoneflies are one of the first aquatic insects to hatch in significant densities making them an ideal fly choice for those fishing steelhead in late winter and early spring. This quick and easy to tie stonefly nymph pattern helps you load up a row in your fly box quickly, allowing for more time on the water.

Stoneflies crawl around on the bottom and often become active with a slight increase in temperature – most notably when the sun is out warming the water a degree or two. The adults flutter on the water but the nymphs crawl to the bank to emerge. Look for them on any streamside snow, and if you see this happening- tie on a small black stone.

Early Black Stonefly Nymph - Manistee River Spring Steelhead

Spring Steelhead

Fish it dead drift like any nymph- preferably in tandem with a larger fly – often an egg pattern to serve as an attractor.  Trout anglers have also found this nymph successful in the early season when the bugs are active.

Borrowing from the pheasant tail nymph, this pattern was designed to be impressionistic and quick to tie.   This fly’s simplicity is what makes it a favorite to fish. Who doesn’t like an effective fly that is quick to tie?

Early Black Stonefly Nymph - Manistee Spring Steelhead

Early Black Stonefly Nymph Optional Step 9.5

Optional Epoxy Head

Tie a few of these Early Black Stones with the sparkling epoxy covered wingcase borrowed from the Copper John fly pattern adding a nice element to it. This sparkle often provides just enough “trigger” to get fish to bite. Even though these flies get active as early as February and continue through April, this pattern, especially with the epoxy head, can come up big in the fall.

Ted’s Early Black Stone is available from Rainy’s Flies and can be bought in stocking fly shops. Below are tying instructions for you fly tiers.

Early Black Stonefly Recipe

Early Black Stonefly Nymph - Natural Adult

Hook:               TMC 2457 #8-12 or Daiichi X120
Thread:            Uni 6/0 Black
Tail:                 Peasant Tail – Black
Body:               Thread
Rib:                  Black Wire – Large
Thorax:            Ice Dub – Peacock
Wingcase:       Pheasant Tail – Black
Legs:                Pheasant Tail – Black


Tying Instructions

Early Black Stonefly Nymph Step - 1
Step 1.
Place hook in the vise and wrap a base layer of
thread to above hook barb and then back to toward the eye.

Early Black Stonefly Nymph Step - 2
Step 2.
Select 8-10 strands of pheasant tail dyed black and tie in on top of the hook so the
natural tips of the tail extend about a hook gape’s distance beyond the barb/base layer.
Now wrap thread back towards hook eye and over the shank which becomes the body.


Early Black Stonefly Nymph Step - 3
Step 3.
Tie in the wire on top of the hook at the thorax area. With your fingernail against the wire to keep
the wire from spinning at the tie-in area, wind the wire back towards the tail. Using wire cutters, trim the wire.

Early Black Stonefly Nymph Step - 4

Step 4. Tie in another clump of pheasant tail (or the remainder of the original material) to serve as the wingcase.

Early Black Stonefly Nymph Step - 5
Step 5.
Dub a robust thorax with Ice Dub.

Early Black Stonefly Nymph Step - 6
Step 6.
Pull the pheasant tail fibers over the thorax as the wingcase
and tie down with two or three wraps – DO NOT TRIM excess material.

Early Black Stonefly Nymph Step - 7
Step 7.
Divide the pheasant tail fibers to each side of the hook and wrap them
so they are positioned about 45 degrees angled backwards.

Early Black Stonefly Nymph Step - 8
Step 8.
Trim the fibers, which are now the legs, so they are slightly longer than the thorax. Whip Finish and
apply water based head cement over the thread body and head.  Standard head cements will melt Ice Dub.

Optional Epoxy Head:

Early Black Stonefly Nymph Optional Step 3.5
Step – 3 1/2.
 Between Steps 3 and 4, tie in a piece of  flashabou.

Early Black Stonefly Nymph Optional Step - 7.5
Step – 7 1/2.  
Pull the flashabou over the wingcase, centered and tie off.

Early Black Stonefly Nymph Optional Step 9Early Black Stonefly Nymph Optional Step 9.5


Step – 9. Apply a drop of Loon UV Knot Sense over the thorax and cure with UV light. You can
use 5-minute epoxy or Clear Cure Goo as an alternative to Knot Sense to achieve the same effect.

Print This Page
copper john nymph, fly tying, how to tie stonefly nymph, ice dub, late winter steelhead fishing, manistee river, stone fly, Stonelfy Nymph Pattern

Lamprey Leech

Posted by Ted Kraimer - December 9, 2012
Lamprey

Lamprey Leech Streamer

The Chestnut Lamprey is an important food source for the Manistee and many Northern Michigan trout rivers. This is what led me to develop the Lamprey Leech fly pattern.  I wanted a pattern that was easy to tie and had lots of motion which resulted in this fun-to-fish and effective pattern. The Lamprey Leech has become my go-to fly when the fish aren’t overly active or are acting lethargic and deserves a place in your fly box.

Each year customers bring a significant number of fish to the net with numerous Chestnut Lampreys attached to them – I can’t help but think that the fish remember these parasites and revengefully attack them when given the chance.

Lamprey - Chestnut Lamprey on Brown

Chestnut Lamprey on a Brown Trout

Lamprey - Chestnut Lampreys

Lampreys Taken Off a Trout

Rich in protein and provocative swimmers, the lamprey often swims against the current making themselves easily noticed and vulnerable to predatory trout.

Late spring and early summer is when these 4-6 inch lampreys are most active and abundant, making them significant to the fly angler. While the months of May and June are optimal, this pattern has caught fish throughout the year  perhaps because of its resemblance to worms and night crawlers, or because of its profile and action.

How to fish the Lamprey Leech Fly

Lamprey - Chestnut Fish

Trout Like Protein Packed Food Including Lampreys

Since it is tied with a bead-head, anglers can fish this fly on both a floating line or a sink-tip. The floating line approach is a fun way to fish shallow water with moderate cover, allowing you to work the fly in and around that cover.

Mends in either type of fly line are very important as it gets this fly to work in conjunction with the current to maximize its movement without stripping it out of the targeted water.  Popping  or snapping the rod tip upwards like a jig, combined with mends, can really seductively work the pattern as can two, quick strips with a long pause in between.

To learn more on an alternative presentation and approach to streamer fishing, read Seductive Streamer Fishing.

Lamprey Leech Recipe 

Hook:                   TMC 200R #4
Thread:                 Uni 6/0 Camel
Bead:                    3/16″ Copper
Tail:                       Marabou – Blood Quill Ginger and Golden Brown
Body:                    Natural Brown  Strung Saddle Hackle
Flash:                    UV Polar Chenille – Copper
Wing:                    Same as tail
Collar:                   Mallard Dyed Wood Duck Flank
Topping:               Sheep Hair – Rust


Tying Instructions 

Lamprey - Step 1Step 1. Place bead on hook and place in vise. Start a thread base from behind the bead to above the hook point. 

Lamprey - Step 2Step 2. Tie in ginger marabou so it extends close to twice the length of the hook.
I typically remove the end of the feather to keep it long and lanky to maximize motion.
Wrap on top of the hook extending 2/3 rds up the shank.

Lamprey - Step 3Step 3.  Repeat Step 2 with the darker marabou so it is the same length.

Lamprey - Step 4Step 4. Tie in a very webby (almost schlappen-like) saddle hackle by the tip and wind up over the marabou.

Lamprey - Step 5Step 5.  Tie in the Polar Chenille and make one or two wraps depending on the amount
of flash desired. Use your bodkin to pick out any trapped fibers.

Lamprey - Step 6Lamprey - Step 6.5


Step 6.  Use just a bit of marabou and tie in so the tips extend past the bend of the hook.

Lamprey - Step 7Step 7. Repeat Step 6 with the darker marabou feather, using just a little more product but remaining sparse.

Lamprey - Step 8Step 8. Tie in mallard flank by the tip, and fold the feather so both sides of the stem
sweep backwards. Make 1 to 1.5 turns to create the collar.

Step 9.  Tie in a clump of sheep hair on the top half of the fly where the tips extend to above
the hook barb. Tie off and apply head cement.

The wet look of the Lamprey Leech. Lots of motion and a great profile.

Print This Page
chestnut lamprey, lamprey, leech, michigan, night crawlers, streamer pattern, trout rivers

Flashtail Clouser Minnow

Posted by Ted Kraimer - July 3, 2012
Flashtail Clouser

Flashtail Clouser

Most anglers are familiar with the Clouser Minnow — a highly effective fly created by smallmouth bass angler and guru Bob Clouser. With its lead eyes and streamlined bucktail construction, the fly acts similar to a bucktail jig and can effectively be fished in a variety of colors for a variety of species, making it one of the most versatile patterns for both fresh and saltwater fish.

The Flashtail Clouser was influenced by the original Clouser Minnow pattern and Dan Blanton’s rendition — the Flashtail Deep Minnow. Notable differences in this pattern include a tail of reflective Flashabou, a body of  synthetic dubbing to add some bulk and transparency, and a belly and wing made from soft, natural materials that have more movement in the water. The result is more durable than bucktail.

Flashtail Clouser - Smallmouth

Smallmouth Bass caught on a Flashtail Clouser

You can fish the Flashtail Clouser in both rivers and lakes with both floating lines and sink-tips. I suggest tying these flies using various sized eyes from bead-chain to a few different sizes of painted dumbbell to allow fishing various depths and current flows.

With floating lines, use leaders around 9 feet in length to allow the fly to sink. When stripped, the jig-style hook and a floating line create a fleeing “hop” while moving forward, imitating a spooked and fleeing baitfish — something predatory fish often key-in on.

Fish this pattern with varying speeds and pauses on sink-tip lines when you need to get the fly deeper and/or in swift moving currents.

Flashtail Clouser - Wet

Flashtail Clouser – Wet

Easy to tie, highly effective and very versatile, tie this pattern in sizes that range from a few inches up to 8 inches in length. You can change the color profile to match any particular baitfish that is prevalent to your favorite fishery or even in attractor color schemes.

Trout • Pike • Salmon • Smallmouth Bass •  Bluegill • Largemouth Bass • Walleye • Steelhead

Flashtail Clouser Minnow Recipe

Hook:           U555 Jig 6,  or TFS 5440 1/0 – 6
Thread:         Gray Uni 6/0
Tail:              50/50 mix of Mirage Opal/silver and Flashabou Pearl
Body:            Hareline Polar Dub – White
Eyes:             S.S. Bead Chain or painted dumbbell – sized accordingly
Belly:            Sheep Hair/Sculpin Wool – White
Wing:            Silver Fox Tail


Flashtail Clouser - Step 1Step 1.
After wrapping a base layer of thread from behind the angled hook shank to above
the hook barb, tie eyes using figure-8 wraps, leaving room to tie in the belly and wing.
Some people prefer to add a drop of Zap-A-Gap to the wraps at this point (optional).

Flashtail Clouser - Step 2Step 2.  Tie in the tail material so it extends backwards twice the length of the hook shank.


Flashtail Clouser - Step 3Step 3.  Very loosely dub clumps of Polar Dub from the tail tie in area to just
behind the eyes. Pick out with scissor point or bodkin.

Flashtail Clouser - Step 4
Step 4.
Tie in a sparse clump of sheep hair behind the eyes so the tips extend halfway down the tail.
After secure, wind your thread between the eye and hook eye. Pull sheep hair over the eyes and tie down.


Flashtail Clouser - Step 5
Step 5.
 On the opposite side of the white belly hair, tie in a clump of Silver Fox tail for
a wing that is slightly longer than the belly.  Trim, tie off and apply two coats of head cement.

Print This Page
blantons flashtail, clouser minnow, fly tying, pattern, recipe, smallmouth bass fly

Fonzi Fry

Posted by Ted Kraimer - April 5, 2012
Fonzi Fry

Fonzi Fry

Each year as millions of salmon eggs turn into salmon, both steelhead and trout take notice and advantage of these naive, freshly hatched “minnows.” I originally developed this fry pattern for steelhead, but it didn’t take long for the trout to convince me they like it too, making it a staple in my fly box from March through June.

In rivers like the Manistee, Betsie, Bear Creek and the Pere Marquette, where natural reproduction of salmon is prolific, have some fry patterns with you. After the salmon eggs develop into alevins in February and March, the egg sack disappears and small fish/fry swim in much of the same gravel section of water that steelhead have recently migrated to.

Fonzi - Steelhead

Fry Eating Steelhead

While these small fish are a protein source, they are also future competition for the steelheads’ offspring. As nature and instinct takes over, the salmon fry is eaten. Trout recognize these naive fish as a food source, too, and are often the reason you see trout breaking the surface when no hatch seems to be taking place — they are chasing these fry to the surface to eat them.

When fishing for steelhead, I fish this fly like any other nymph — typically below an egg pattern — and I tend to swing the fly at the end of the drift, even as it rises off the bottom. These slack-less drifts/presentations are unrecognizable as you feel the tug from a fish immediately. Look for the take to be anywhere through the drift with this pattern.

Fonzi - Brown Trout

Brown Trout Love “Minnows”

Both fry and trout tend to move to the edges of the river— especially in higher water — which makes it a great place to target trout. Fishing the Fonzi Fry on a floating line with either a mono leader or sinking leader with a down-and-across swing (think soft-hackle fishing) works well. At the end of your drift (the “hang-down”), twitch the fly and strip it back in to add movement and possibly elicit a fish.  This pattern can also be fished on a smaller sink-tip line to get a little deeper or it can be fished as a tandem rig behind a much larger streamer pattern.

The Fonzi Fry is available from Rainy’s Flies and can be bought in stocking fly shops. Below are tying instructions for you fly tiers.

Fonzi - Wet

Wet Fonzi Fly


Recipe

Hook:           TMC 2457 #8
Thread:         Gray Uni 6/0
Tail:              Grizzly Marabou
Body:            Ice Dub – UV pearl
Thorax:        Ice Dub- UV pearl
Collar:           Teal Feather
Eyes:              Bead Chain – Black, Small
Back:            Ice Dub – peacock

Tying Instructions

Fonzi - Step 1Step 1. Wrap base layer of thread to above hook barb.

Fonzi - Step 2Step 2. Tie in tail – length to be as long as hook itself. Tie off

Fonzi - Step 3Step 3. Dub ice dub body, loosely, 2/3rds up shank towards hook eye.

Fonzi - Step 4Step 4. Tie in Eyes just behind hook eye on underside of the hook

Fonzi - Step 5Fonzi - Step 5.5

Step 5. Tie in teal collar by the tip and fold, wrapping at least once just in front of the dubbed body.

Fonzi - Step 6Step 6. Dub in front of the teal and around the hook eye (figure-8)

Fonzi - Step 7Fonzi - Step 7.5


Step 7. Prepare some peacock ice dub and tie in so it extends forward,
over eye, wrap down behind hook eye, then move thread behind eyes.

Fonzi - Step 8Step 8. Pull Ice Dub back towards hook bend and tie down. Whip Finish.

Notes:

Pick out some of the body dubbing to give the fly a minnow like appearance but be careful it doesn’t extend beyond the marabou tail.

Be sure to use water-based head cement on this fly as other types will ruin the synthetic ice dub back. I have found Fish Pimp – Hard Headed head cement to be a very good product.

Print This Page
alevin, Bear Creek, Betsie, fonzi fry, fry pattern, manistee, Pere Marquette, rainys flies, steelhead, trout
«‹34567›»
Guide Trips - Fly Fishing Float Trips

Guide Trips & Pricing

Lessons - Learn to Fly Cast or Improve

Casting Lessons

Testimonials

About Ted Kraimer Fishing Guide

About Your Guide, Ted Kraimer

Fish & Seasons

Bluegill, Panfish and Bass Fly Fishing on Local Lakes Near Traverse City

Bluegill / Panfish / Bass

Fall Steelhead Manistee River

Steelhead

King Salmon Fly Fishing - Betsie River Near Traverse City

Salmon

Trout Fishing Manistee River near Traverse City Michigan

Trout

Fly fishing for smallmouth bass Manistee River and Northern Michigan Lakes

Smallmouth Bass

Carp Fishing West Grand Traverse Bay

Golden Bones / Carp

Ted Kraimer • Current Works, LLC • PO Box 333 • Traverse City, Michigan 49685 • (231) 883-8156

© 2024 Current Works, LLC — All rights reserved
  • Home
  • Guide Trips & Pricing
  • Fishing Report
  • Fish & Seasons
  • Rivers & Hatches
  • Fly Tying
  • Articles
  • Gallery
  • About
  • Sitemap