Current Works Guide Service
  • (231) 883-8156
  • ted@current-works.com
  • Book a trip
  • Subscribe to Newsletter
  • Home
  • Guide Trips & More
    • Guide Trips & Pricing
    • Casting Lessons
    • Gift Certificates
    • Book a Trip
  • Fishing Report
  • Fish & Seasons
    • Steelhead
    • Trout
    • Smallmouth Bass
    • Salmon
    • Bluegill / Panfish / Bass
    • Golden Bones / Carp
  • Rivers & Hatches
    • Upper Manistee River
    • Lower Manistee River
    • Betsie River
    • Boardman River
    • Hatch Chart
  • Fly Tying
  • Articles
  • Gallery
  • About
    • About Your Guide
    • Testimonials
    • Newsletter
    • Area Information

Relate to these articles

Rabbit Strip Leech Fly Pattern

Posted by Ted Kraimer - September 9, 2013
Swing Leech - Rabbit Strip Leech

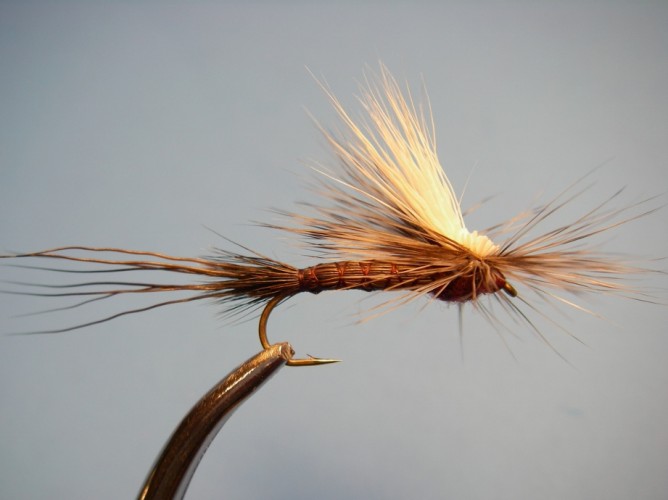
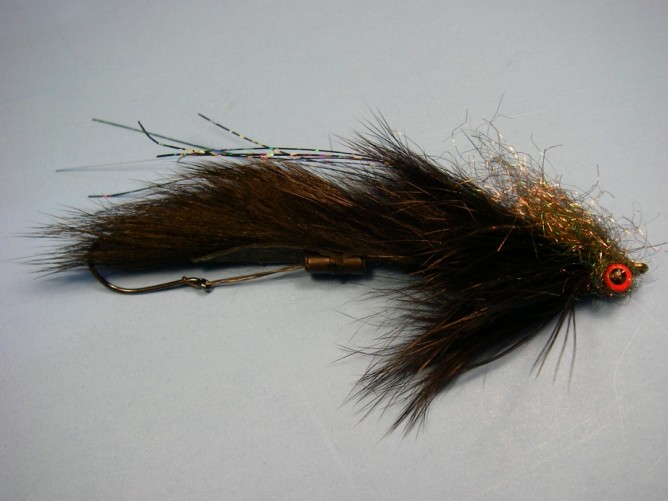
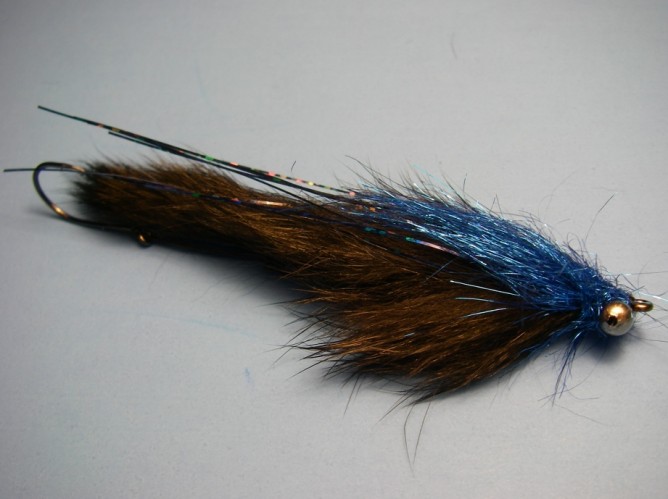
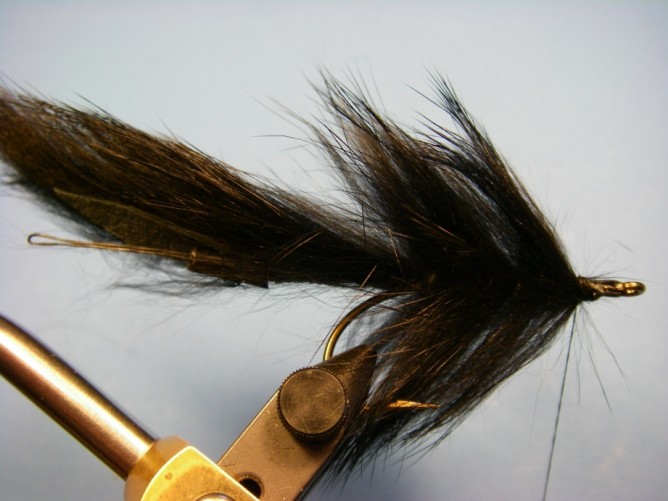
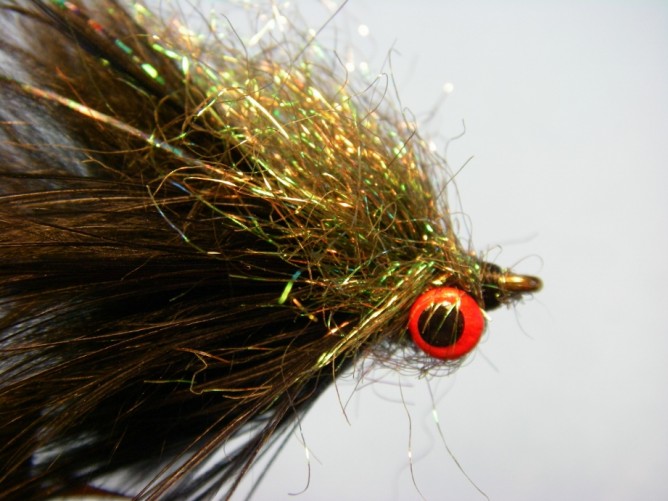
Rabbit Strip Leech. Sometimes called a String Leech.

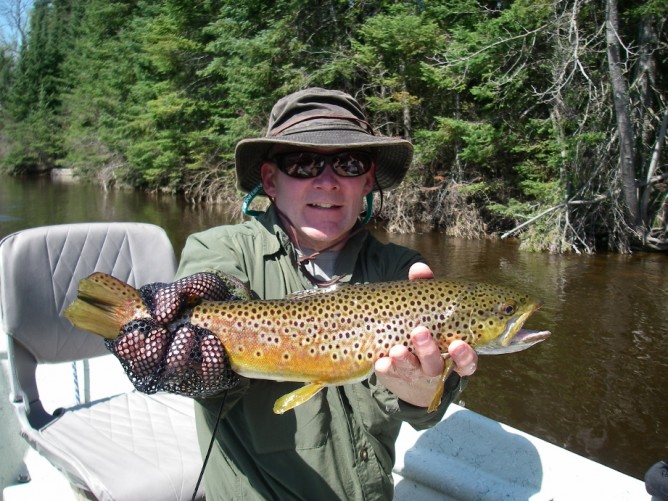
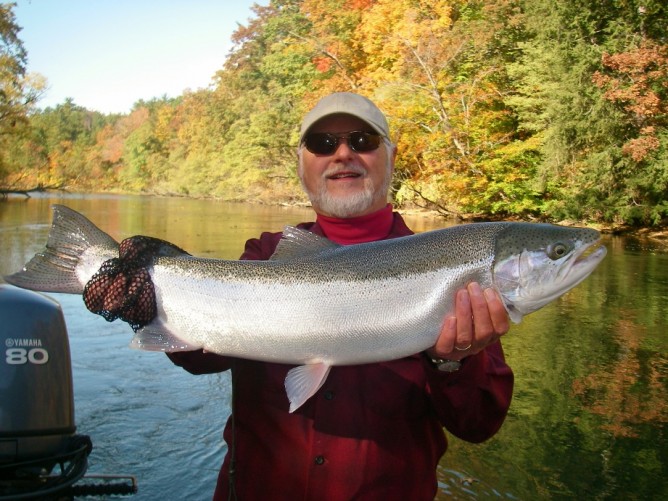
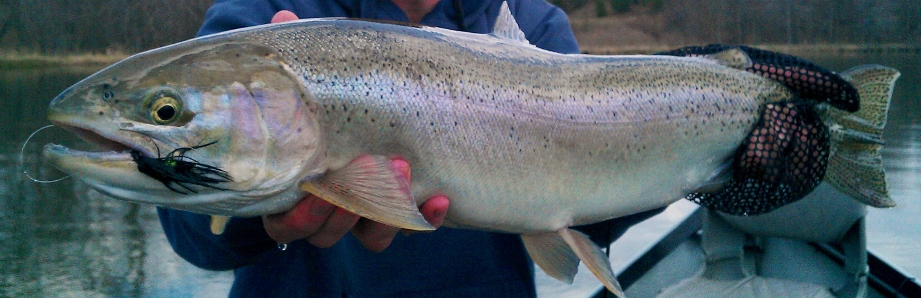
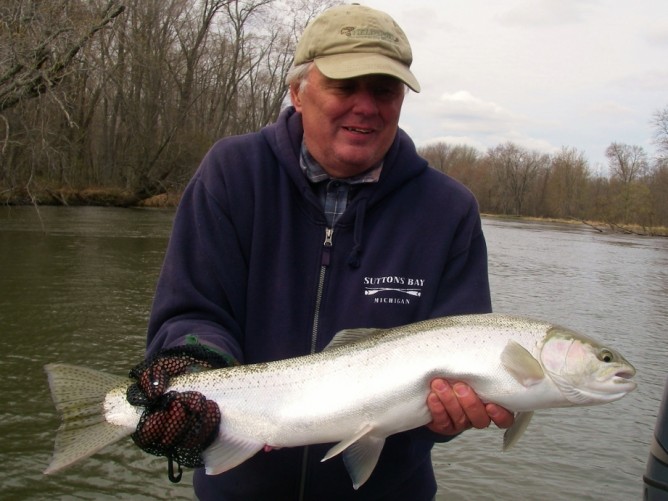
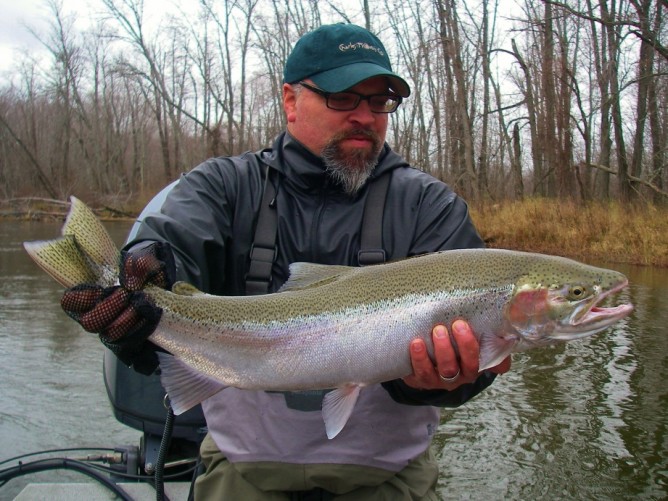
Swinging flies for steelhead is becoming more popular with anglers using two-handed switch and spey rods. While the classic wets and “spey” style flies catch fish, patterns that are closer to streamers have proved effective. These larger patterns can bring a little more attention to themselves as they swim through an expansive run or in dirty or stained water. A rabbit strip leech or swing leech is about as basic as it gets for a pattern of this nature offering a good profile, action/moment and a proven track record.

Swing Leech - Steelhead Fly Pattern

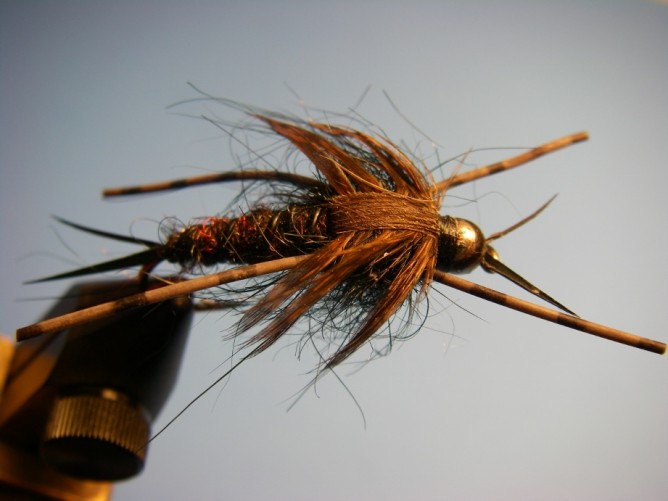
Anglers that swing or strip streamers often complain that fish nip at the tail, missing the hook. This pattern places the hook near the end of the tail by using a loop of Berkley Fireline. This has three distinct advantages: 1. allows you to replace the hook in the event that it dulls or becomes bent further extending the life of the fly; 2. places the hook at the back of the fly where “nipping” fish will find it; and 3. eliminates the fouling of the long tail around the hook bend. This method/design works well with a number of streamers – try incorporating a loop in your fly patterns.

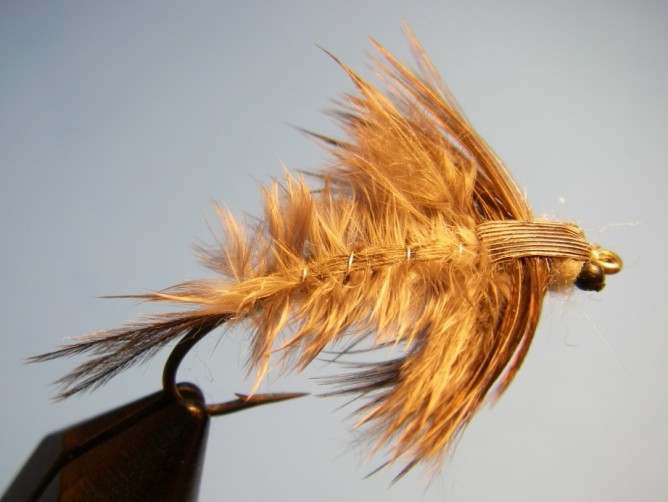
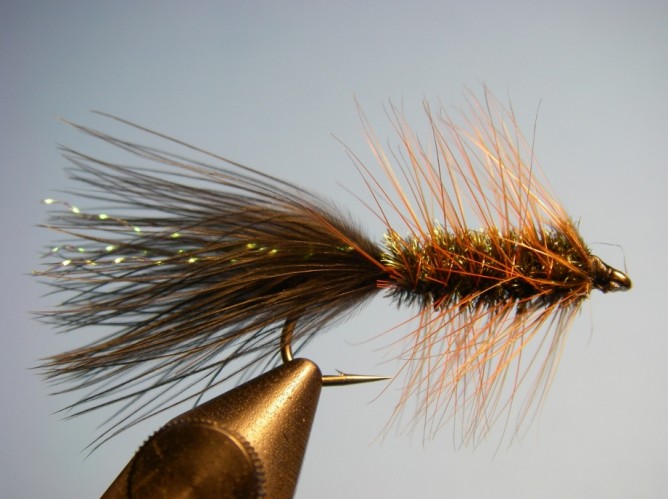
This pattern is only an example of one of the potential color schemes you can try. Try different color rabbit strips (browns, olive, white or black), ice dubs, collars, etc. to meet your needs and desires and fully make your fly box versatile by using various sized eyes for different conditions – from lead eyes to bead chain.

Top 5 Steelhead Flies - Leech Pattern - Miles Davis

The “Miles Davis” is a slight variation.
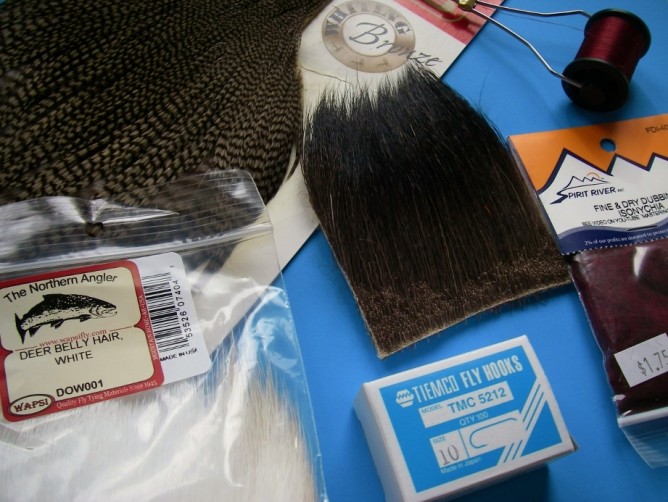
Recipe

Shank:                  Mustad 3366 2/0
Rear Hook:           Gamakatsu Octopus or Drop Shot
Thread:                 Fly Master Plus – Black
Tail:                      Black Rabbit Strip
Tube:                   Black Tube
Body:                   Black Rabbit Strip
Collar:                 Black Schlappen
Wing:                  Flashabou – Black Holographic
Dub:                    Ice Dub – Peacock

Tying Instructions

Swing Leech - Step 1

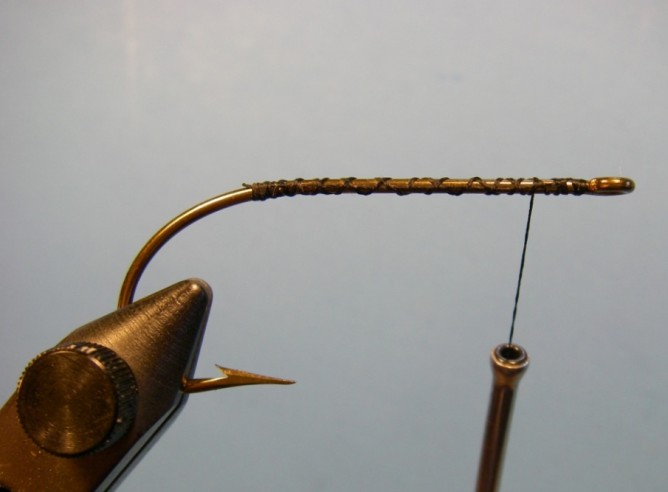
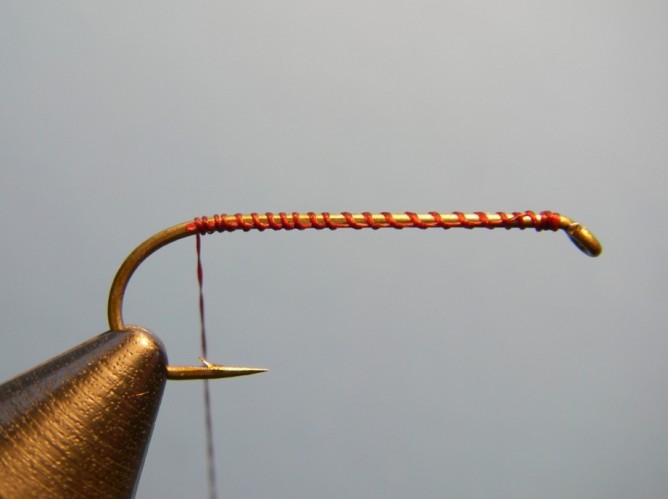
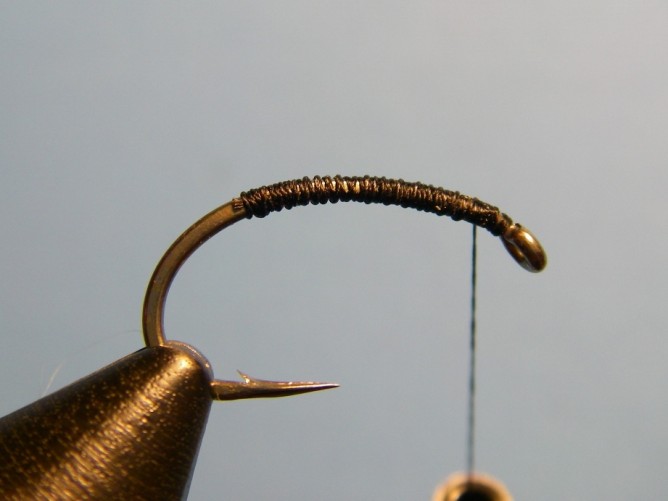
Step 1. Insert hook in vise jaws and add a base layer of thread from behind hook eye to above barb.

Swing Leech - Step 2

Step 2. Cut a section of 20# Fireline – approximately 7 inches and fold in half. The loop end should extend off the back of the hook at a distance that meets your fly size needs – this example will extend two inches.

Swing Leech - Step 3

Swing Leech - Step 3.5


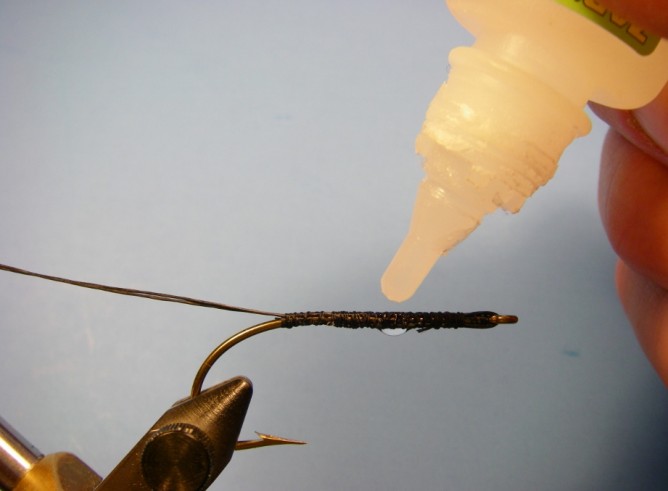
Step 3. Wrap the Fireline on top of the hook shank with tying thread. Place cut ends
of Fireline down through the hook eye and along the underside and wrap some
more. Whip finish and tie off. Apply a coat of Zap-A-Gap to secure and allow to dry.

Swing Leech - Step 4

Swing Leech - Step 4.5


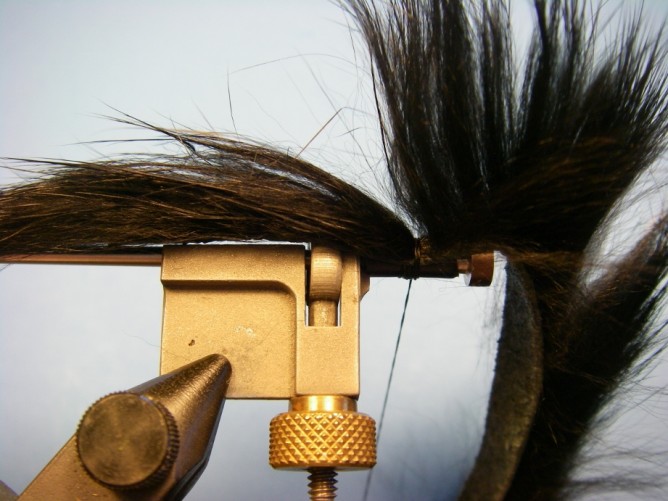
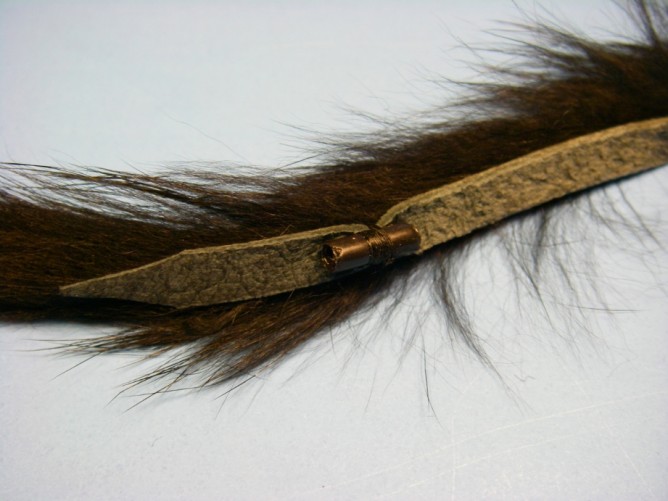
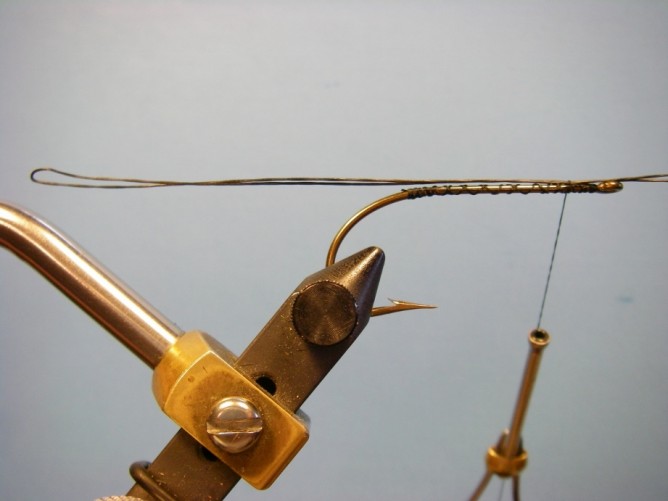
Step 4. Using a tube fly vise or adapter, tie a  1/4 inch section of tube to the end part of your rabbit strip.
Be careful you don’t wrap over the rabbit hair but only over the pelt itself. Tie off.

Swing Leech - Step 5

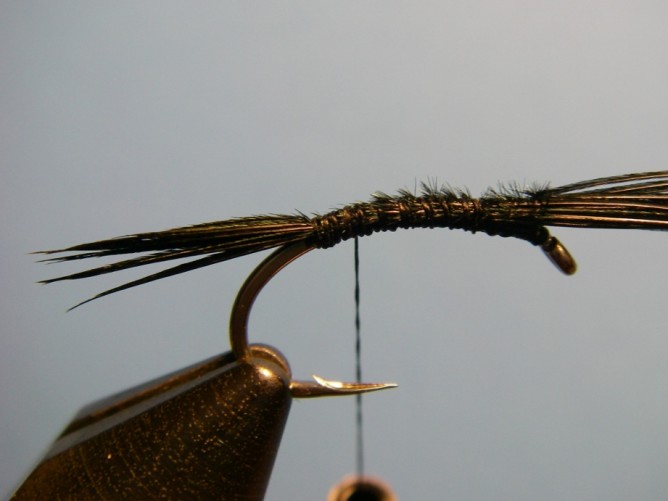
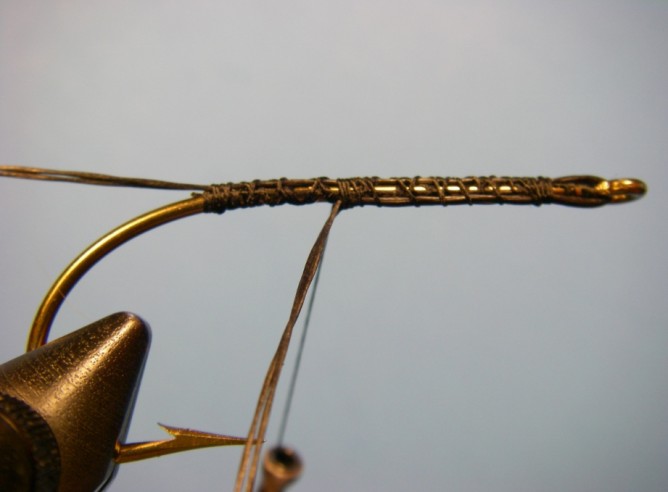
Step 5. Start thread behind hook eye and wrap back to where previous wraps are.
Tie in Rabbit strip so the Fire Line loop goes through the tube and extends where
the pelt of the rabbit strip extends to the end of the loop. Do not trim Rabbit.

Swing Leech - Step 6

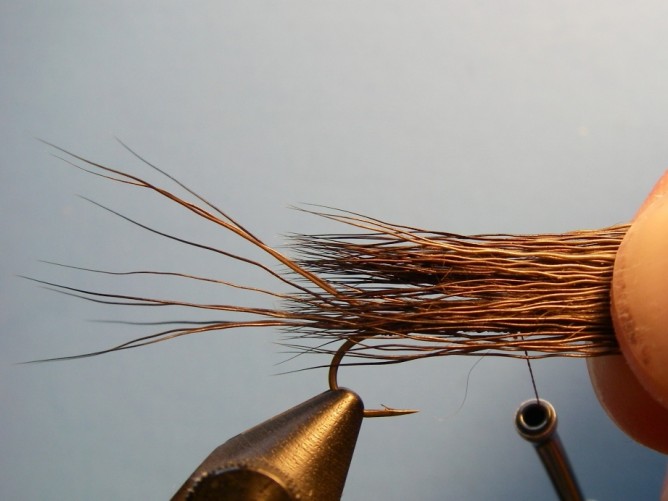
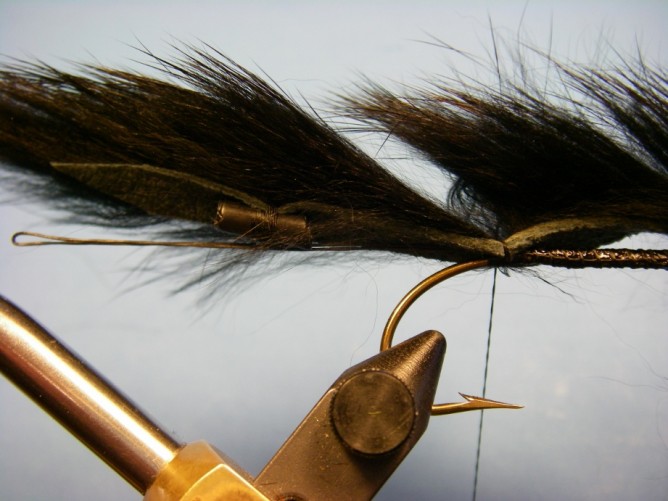
Step 6. Take remaining rabbit and wrap along hook shank towards hook eye,
sweeping rabbit hair backwards. Stop about 1/2″ behind hook eye.

Swing Leech - Step 7

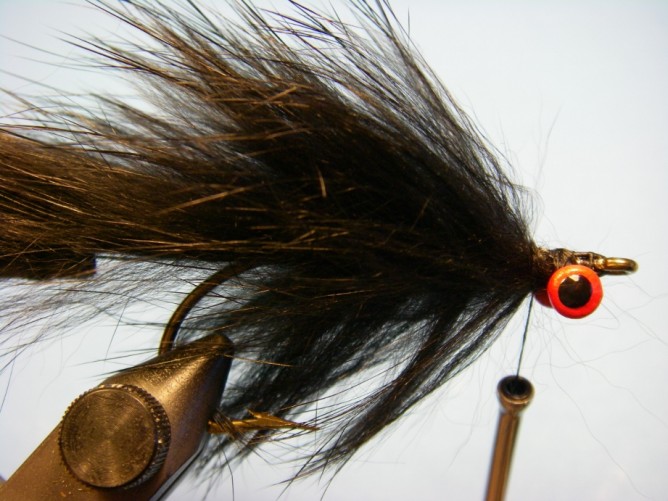
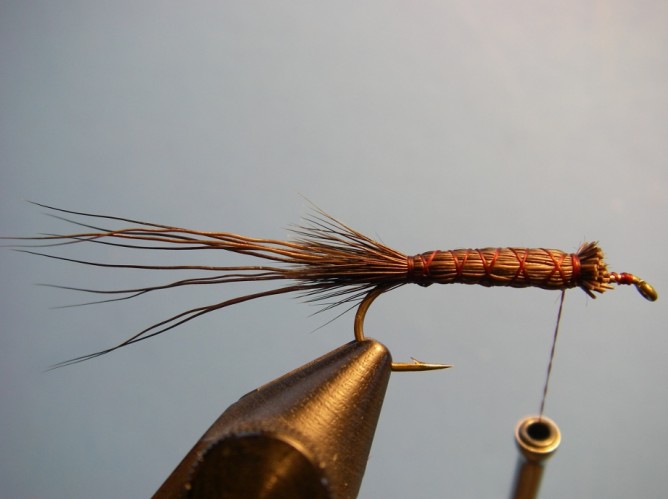
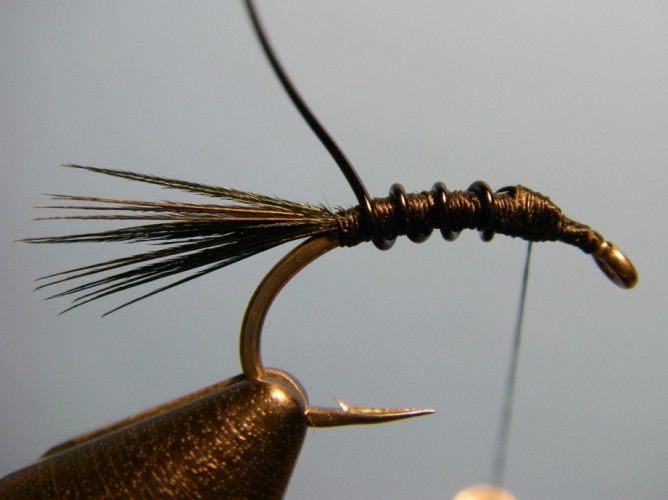
Step 7. Figure-8 the eyes on the bottom of the shank so that the rabbit fur strip remains up.

Swing Leech - Step 8
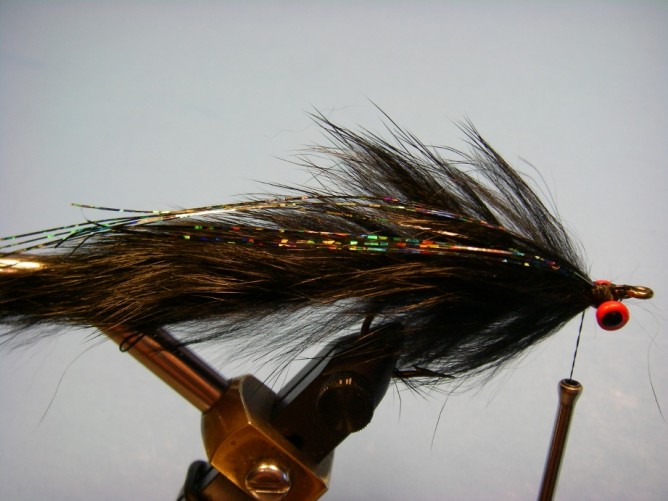
Step 8. Tie in Flashabou wing with staggered ends without any strands extending beyond the rabbit.

Swing Leech - Step 9
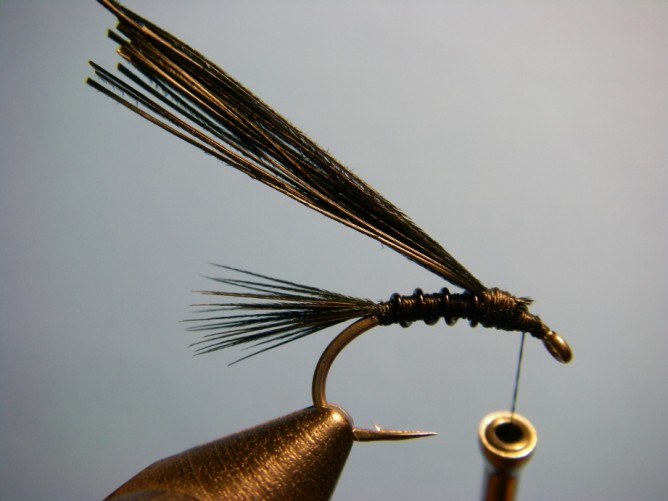
Step 9. Wrap the schlappen forming a shoulder on the fly.

Swing Leech - Step 10

Swing Leech - Step 10.5


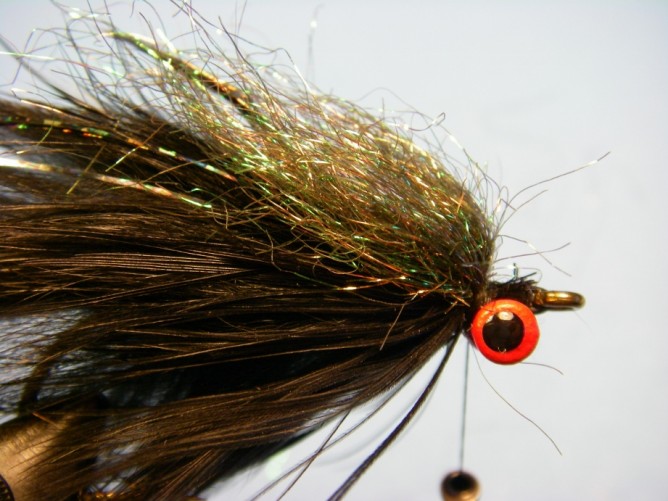
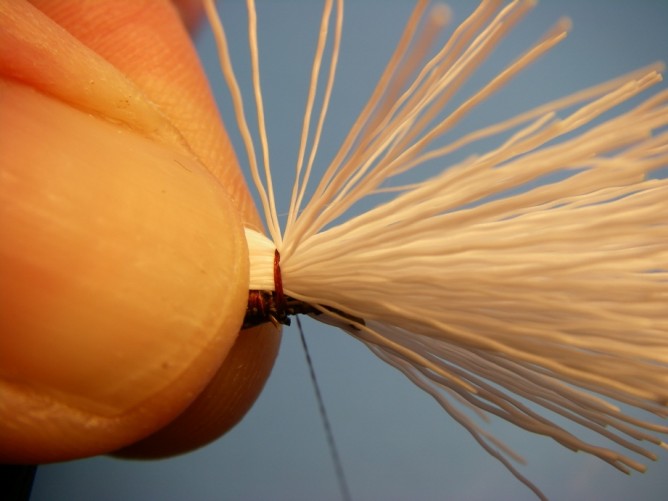
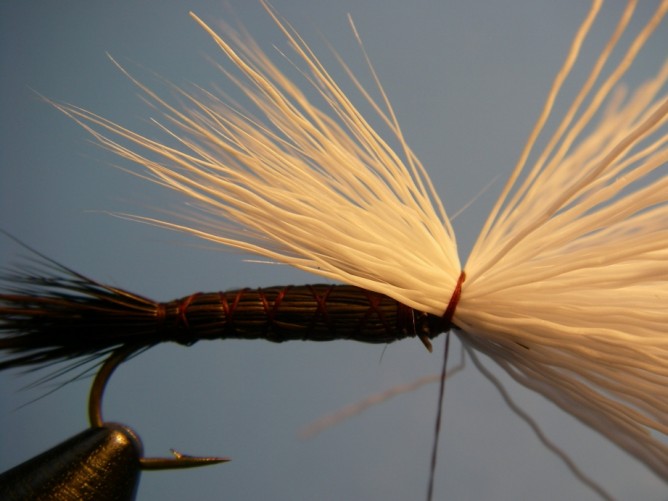
Step 10. Take a clump of ice dub and place it on top of the hook extending
backwards a little bit. Dub the rest of the head loosely and pick out.

Swing Leech - Step 11
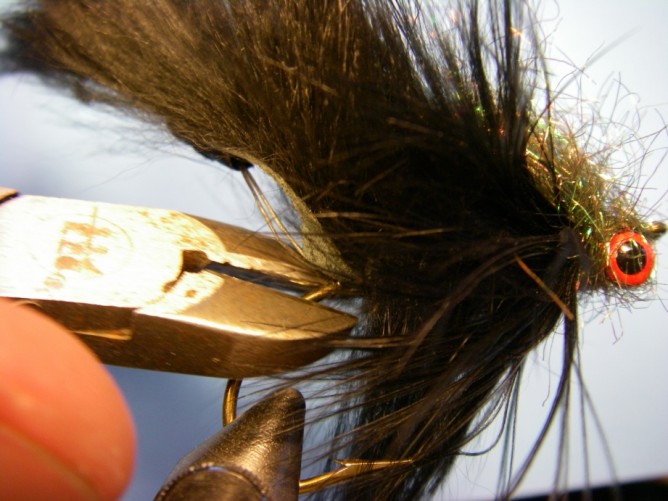
Step 11.
Whip finish and cut line. Using side cutters, cut the bend off  the hook.
Thread the Fireline loop through the piece of tubing attached to the rabbit and attach
a hook by pushing the loop through the hook eye and over the hook then drawing tight.

Swing Leech - Rabbit Strip Leech
Finished Rabbit Strip Swing Leech

Notes:  Tie up a few shanks with Fireline loops during one session to speed up the process.

how to tie a rabbit strip leech, instructions, loop leech, loop streamer, rabbit strip leech, spey, string leech, strip leech fly pattern, swinging flies, two-handed rods

Dry Fly Fishing “Do’s”

Posted by Ted Kraimer - June 14, 2013
Dry Fly Do's - Brown Trout

Brown Trout caught on a Dry

For most trout anglers, catching fish on a dry fly is the highlight of the sport – it’s both visual and satisfying when it all comes together – pure deception. So when you come across a fish rising and feeding on the surface, it’s hard not to get excited. Just do some things right to increase your chances of catching that fish. Below are some tips for dry fly fishing.

Dry Fly Do's - Rising Trout

Dry Fly Do's - Rod-Tip-HighStop the Rod Tip High

Getting your line, leader and ultimately your fly to straighten out at the distance you want is crucial – without doing so you risk your fly pilling up next to your coiled-up leader and line, often requiring corrective measures so you don’t spook the fish. That is if you haven’t already.

By stopping the rod tip high at the end of your forward casting stroke, you have helped ensure a tight, compact and efficient loop that will have enough energy to straighten out.  Once the line has straightened, do follow it down to the water’s surface rather than lead it.

Dry Fly Do's - Rod-Tip-Low

When you consistently stop the rod at the same height, the length of the cast is consistent, too. If you lower your rod tip some, your cast can be longer which not only might be off the mark, but into some unwanted bush, tree, log or other snag.

Not only is it important to stop your rod tip high, but to push that rod to an abrupt stop to get a powerful cast that straightens out and on target.  After that line has straightened out, gravity will take the fly to the water, just follow the line and fly to the water as it drops.

Mend

Dry Fly Do's - No-MendThe majority of the time when fishing dry flies, a drag-free drift is paramount — the difference between catching fish and putting them down.  The further we cast and the more water that our line is perpendicular to, the greater the chance that the current is going to push against it, putting a bow into the line, dragging the fly across the surface. This drag, often resembling a water skier cutting the wake, can put the most eager fish down and out without another chance of catching them. Avoid doing so by mending.

Mending fly line is the proactive placement of slack to compensate for faster or slower currents than the speed of the current the fly is in. Mending line isn’t enough – it has to be done correctly. If you simply flip your rod to the side, the fly will often skitter or drag on the water – the exact thing you are trying to avoid.
Dry Fly Do's - Mend
I encourage anglers to have some extra “mending line” pulled off the reel and placed in the hand not holding onto the rod. After the cast, and with the line lying in the upward facing hand, draw a circle with the rod tip, accelerating through the motion where you want the extra line to go.  The acceleration should take the mending line and apply it to the water – without the extra line, the motion will take line from the path of least resistance – the dry fly – and drag it across the water. The larger the circle, the larger the mend and the more “mending line” required.

Line Management

Anglers often see a rising fish and start pulling line off the reel as they are casting to it. While it might work sometimes, there is a good chance something will go wrong by casting too long, not long enough, not having line for mending, or putting out too much extra line, which can get in the way or caught on something once the fish is hooked.

In a typical dry fly feeding scenario, flies repetitively drift downstream to where a fish has chosen to hold and eat, giving us a moment time to plan the approach. Think like a sniper.

Dry Fly Do's - Line-ManagementTry this: draw an imaginary line from where you are standing to where the fish is rising. Now, move that imaginary line and its length downstream, inside and nowhere near the fish. Pull off enough line and cast your fly to that distance which will give you the correct distance to the fish when you cast to it.

Next, pinch the line which will keep the correct distance of line out as you pull the extra line off your reel required for your “mending line”. Now, pick your fly up off the water and cast it just upstream of the fish and mend the extra line proactively. If the fish doesn’t eat the fly, make sure the fly, leader and line have drifted away from the fish before stripping in your “mending line,” then pick up the line and fly and cast again.

If you already have more line off the reel that you know you aren’t going to use, reel it up to avoid getting it caught on something.

By applying these three “Do’s” to your dry fly fishing, you avoid a lot of the common mistakes I witness and significantly improve your chances at hooking that rising fish. Remember, there are other variables that can make the difference, including the fly pattern and tippet size – but without a good presentation those things won’t matter.

dry fly fishing, fly casting, fly fishing, line management, mending fly line, mending line, tips for dry fly fishing

Tilt-Shoot Iso – Isonychia Fly Pattern

Posted by Ted Kraimer - June 14, 2013
Tilt Shoot Iso Isonychia Fly Pattern

Ted’s Tilt Shoot Iso

While the “hex” mayfly gets the bulk of praise and attention from Michigan anglers, there is another mayfly that gets my praise. The Isonychia emerges over a longer period of time, is easier to cast, and doesn’t wait until dark to show – what’s not to like? Having a number of names Iso, Slate Drake, White Gloved Howdy, Maroon Dun among others, it should be thought of as important and should be found in any Michigan trout angler’s fly box from June through September.

There are two genus of the Isonychia (Salderi and Bicolor) which inhabit many of our local rivers. Each have different characteristics. Rather than give you a taxonomical description or bore you with entomology, let me provide you with the brass tacks:

Tilt-Shoot-Iso-Isonychia-Natural-Iso-Spinner.jpg

Natural Isonychia Spinner

The nymphs love swift water in gravel sections, adults/duns range in size with the most common being 10-14, adults/duns bodies vary in color between the two genus and the particular river (from a light creamy olive, to tan, to a brown-mahogany color), Adults/duns have deep dun colored wings where spinners have dark maroon bodies with clear wings, and both duns and spinner have distinct white front legs making them easy to identify. The largest concentration and emergence is in June extending through mid-September with the first insects large in size and tend to get smaller through that time period.

The duns typically emerge in the evening, but they can be found on the water at almost all times of the day, especially in the later months and when cloud cover is present.  Spinners, too, typically congregate in swarms in the evening before they fall to the water’s edge to drop eggs in riffle sections of rivers. For years it was thought that Iso nymphs only climb onto shore before emerging, but it is now accepted that they emerge in mid-stream as well – trout have known that for years.

Tilt Shoot Iso Isonychia Brown Trout

Brown Trout caught on a Tilt-Shoot Iso

The Tilt-Shoot Iso is a pattern I created and have been using the past 10 years with great success.  While it isn’t the easiest fly to tie for those unfamiliar with hair body patterns, you will find vast improvements after a number of attempts.

This version of a parachute provides a realistic silhouette of the wing while the pattern sits low in the water for fish to easily see — important when fishing broken water. You can change the body color by changing the thread color to tan or olive, and its worth tying some with a more natural gray color wing/post. Tie this pattern in smaller sizes and you will find it will work as an imitation for a number of mayfly spinners.

Ted’s Tilt-Shoot Iso is available from Rainy’s Flies and can be bought in stocking fly shops. Below are tying instructions for you fly tiers.

Tilt Shoot Iso Isonychia - Step 0

Tilt-Shoot Iso Recipe

Hook:             TMC 5212 10 – 14
Thread:          Uni-6/0  Wine
Tail:                Moose Body
Body:              Moose Body
Post:               Deer Belly Hair – White
Hackle:           Grizzly Dyed Dun
Thorax:          Fine & Dry Dubbing – Isonychia

Tying Instructions

Tilt Shoot Iso Isonychia - Step 1
Step 1.
Place hook (size 10) in vise and wrap a thread base from behind the eye to above the barb.

Tilt Shoot Iso Isonychia - Step 2
Step 2. Cut 6 – 8 moose body hairs, clean and stack/even them and tie in on top of the hook about
one hook gape’s distance behind the eye.  Tie down along the shank to above the hook barb and back again.

Tilt Shoot Iso Isonychia - Step 3
Step 3. Cut a large clump of moose body hair (approx. the thickness of two wooden match sticks), clean and stack/even. Measure the hair by laying the clump along the hook where the tips extend just beyond the hook shank. Trim the butt ends so the body will extend from the where we tied the tail in to just beyond the shank.

Tilt Shoot Iso Isonychia - Step 4
Step 4. Lay the clump of moose along the hook making sure it completely surrounds the hook
shank for complete coverage. After a few wraps to secure it in place, hold the moose taught with your
left hand as you wrap the thread towards the hook bend with the bobbin in your right hand.

Tilt Shoot Iso Isonychia - Step 5
Step 5.
Take the thread wraps to above the barb and make two tight wraps to secure
and then wrap the thread back toward the hook eye crisscrossing the thread
wraps making an X pattern. Once secured, trim off any excess butt material.

Tilt Shoot Iso Isonychia - Step 6.5Tilt Shoot Iso Isonychia - Step 6

Step 6. Select a clump of deer belly hair for the post/wing (approximately the thickness of three match sticks). Clean and stack/even it.  Lay the hair on top of the hook so the natural points extend to the end of the body.
Tie in the post/wing where the moose body ends and do not trim the butt ends of the hair.
Because the hair is hollow it can easily be cut by too much thread pressure.

Tilt Shoot Iso Isonychia - Step 7
Step 7. Pull both the tips and the butts up and wrap along the shank to encourage the hair to move upward. Tie in a hackle feather at the base of the post/wing with the dull side of the feather facing you. The feather, after being wrapped, should extend to the end of the X-wraps on the body.

Tilt Shoot Iso Isonychia - Step 8
Step 8. Dub a tight thorax on both sides of the post/wing that is slightly
thicker than the body/abdomen also encouraging the post/wing upward.

Tilt Shoot Iso Isonychia - Step 9Tilt Shoot Iso Isonychia - Step 9.5

Step 9.
Wrap the hackle parachute style under both the tips and butts of the post/wing.
Wrap the hackle firmly and it will compress and seat nicely against the post
creating a durable hackling. Tie off between the hook eye and dubbing.

Tilt Shoot Iso Isonychia - Step 10Tilt Shoot Iso Isonychia - Step 10.5

Step 10.
Pull the butt ends of the wing/post forward and trim only the
butts close to the base, just above the hackle.

Tilt Shoot Iso Isonychia - Step 11Tilt Shoot Iso Isonychia - Step 11.5

Step 11. Apply a drop of thin head cement at the base of the post and the thread head.

Tilt Shoot Iso Isonychia Fly Pattern

Finished Tilt-Shoot Iso Isonychia fly pattern

dry fly, how to tie, iso, isonychia, isonychia bicolor, isonychia fly pattern, isonychia salderi, michigan, rainys, slate drake, tilt-shoot Iso, white gloved howdy

Top 5 Steelhead Flies for Michigan

Posted by Ted Kraimer - March 17, 2013

Top 5 Steelhead Flies - Fall Steelhead Manistee River

Steelhead anglers in Michigan and the Great Lakes have a lot of choices when looking to stock their fly boxes. There’s no shortage of effective flies, but choosing a select few can almost be confusing or even intimidating. This list of top 5 steelhead flies includes patterns that have produced for me and my clients over the years – both in spring and fall.

Those who have fished with me know that my fly boxes include more patterns than these. The purpose of this list is to help you identify and start to build a collection that will fish well and become the favorite, producing staples in your fly box.

Hex Nymph

Top 5 Steelhead Flies - Hex Nymph Pattern Bear's Hex

Bear’s Hex Nymph

Hexagenia mayfly nymphs or “wigglers” are significant, since many of our rivers with steelhead also have this silt burrowing mayfly. One of the largest mayflies, the hex, looks buggy. Many of the patterns used to represent them also share looks similar to other important food sources, like sand sculpins and sucker minnows.  No steelhead box should be without some.

Commercially Tied Patterns: Bears Hex Nymph, Schultzy’s Rabbit Hexum, Ted’s Edible Hex, Fox’s Shuck Hex Nymph

Sizes: #6 – 10


Caddis

Top 5 Steelhead Flies - Caddis Pattern Boogie Woogie Caddis

Boogie Woogie Caddis

Lift just about any rock or log in the river, and you will find caddis cases clinging to the cover. This grub looking pupa ranges in size and color, but it seems that green and chartreuse are the most effective for Michigan steelhead. Most patterns are tied larger and brighter  than real life and “suggest” caddis, but serve more as an attractor – especially when fishing stained water. Small, natural looking patterns in green, olive and cream are worthy of a place in your box when fishing low, clear water often associated with winter steelheading.

Commercially Tied Patterns: Disco Caddis, Boogie Woogie Caddis,  PM Caddis, Flashy Brassie Grub

Sizes: #6 – 12

Click here to learn how to tie Caddis patterns.

Steelhead Bugger

Top 5 Steelhead Flies - Steelhead Bugger

Steelhead Bugger

The “Crescent wrench” of all fly boxes for most species is the wooly bugger — because it works. Tied with a touch of flash and with the natural, buggy appearance of peacock, the steelhead bugger (a.k.a. “The Steelie Bugger”) is a slight variation from the standard wooly bugger. Both patterns suggest a leech, a stone fly and who knows what else – it’s the Steelhead Bugger that seems to be even better. Make sure you have some in your fly box.

Commercially Tied Pattern: Umpqua’s Steelhead Bugger

Sizes: #6

Click here to learn how to tie a variation of this pattern.


Egg Pattern

Top 5 Steelhead Flies - Egg Pattern Nuke Egg Fly

Nuke Egg

Tandem fly rigs are the norm when targeting steelhead. More often than not, one of the flies is an egg pattern. Serving as a realistic egg imitation or when large and bright – an attractor, no veteran steelhead fly angler will deny the effectiveness of an egg pattern. To learn more about fishing eggs for steelhead, read, Egg Patterns.

Commercially Tied Patterns:
Glo Bugs (Oregon Cheese, Golden, Chartreuse)
Crystal Eggs (Peach, Chartreuse)
Nuke Egg (Oregon Cheese over Steelhead Orange,   Chartreuse over Flame, Egg over Steelhead Orange.
Rag Eggs (Clown, Apricot/Dark Roe , Egg/Salmon, Oregon Cheese/Burnt Orange)

Sizes: #6-10

Stonefly

Top 5 Steelhead Flies - Stonefly PatternTrout Retriever

Trout Retriever

The first insect of the year to hatch in significant numbers is the small black stonefly. Tie one on when you see them crawling on snow banks or fluttering on the surface when the sun is out and water temps increase slightly, tie one on. Our waters have a variety of stoneflies ranging from the small stones mentioned above to some in excess of two-inches long. My favorites are black and cover the size range. As water temps cool in the fall and leaves start to decompose underwater, stoneflies get active making them a good choice at all times of the year. Oh, and when the bite is tough, sometimes the small stone pattern is enough to trick the fish into eating a small snack even if they aren’t actively hatching.

Commercially Tied Patterns: Mercer’s Biot Epoxy Stone – Dark, Trout Retriever, Ted’s Early Black Stone, 20 Incher

Sizes #6-12

Honorable Mention: Leech

Top 5 Steelhead Flies - Leech Pattern - Miles Davis

Miles Davis

Often the spring run can coincide with winter’s thaw and/or spring showers leading to high, dirty water conditions where your small realistic nymphs can go unnoticed.  Tied with rabbit strips or marabou, the black leech’s large profile, undulating motion and sometimes combined with some sparkle or flash can come up big, deserving a place in your fly collection.  High and dirty water in the fall isn’t much of a concern to fall steelhead anglers here in Michigan, but those looking to swing flies on sink-tips should keep a leech handy.

Commercially Tied Patterns: String Leech, Silvey’s Tail Light, Miles Davis, Larimer’s Reverse Marabou

Sizes: Go big

Top 5 Steelhead Flies - Spring Steelhead Leech Pattern

Leech Eating Spring Steelhead


bears hex nymph, disco caddis, egg patterns, great lakes steelhead, leech, michigan steelhead, nuke egg, steelhead bugger, steelhead flies, steelie bugger, stonefly nymph

Early Black Stonefly Nymph Pattern

Posted by Ted Kraimer - March 17, 2013
Early Black Stonefly Nymph

Ted’s Early Black Stone

Small black stoneflies are one of the first aquatic insects to hatch in significant densities making them an ideal fly choice for those fishing steelhead in late winter and early spring. This quick and easy to tie stonefly nymph pattern helps you load up a row in your fly box quickly, allowing for more time on the water.

Stoneflies crawl around on the bottom and often become active with a slight increase in temperature – most notably when the sun is out warming the water a degree or two. The adults flutter on the water but the nymphs crawl to the bank to emerge. Look for them on any streamside snow, and if you see this happening- tie on a small black stone.

Early Black Stonefly Nymph - Manistee River Spring Steelhead

Spring Steelhead

Fish it dead drift like any nymph- preferably in tandem with a larger fly – often an egg pattern to serve as an attractor.  Trout anglers have also found this nymph successful in the early season when the bugs are active.

Borrowing from the pheasant tail nymph, this pattern was designed to be impressionistic and quick to tie.   This fly’s simplicity is what makes it a favorite to fish. Who doesn’t like an effective fly that is quick to tie?

Early Black Stonefly Nymph - Manistee Spring Steelhead

Early Black Stonefly Nymph Optional Step 9.5

Optional Epoxy Head

Tie a few of these Early Black Stones with the sparkling epoxy covered wingcase borrowed from the Copper John fly pattern adding a nice element to it. This sparkle often provides just enough “trigger” to get fish to bite. Even though these flies get active as early as February and continue through April, this pattern, especially with the epoxy head, can come up big in the fall.

Ted’s Early Black Stone is available from Rainy’s Flies and can be bought in stocking fly shops. Below are tying instructions for you fly tiers.

Early Black Stonefly Recipe

Early Black Stonefly Nymph - Natural Adult

Hook:               TMC 2457 #8-12 or Daiichi X120
Thread:            Uni 6/0 Black
Tail:                 Peasant Tail – Black
Body:               Thread
Rib:                  Black Wire – Large
Thorax:            Ice Dub – Peacock
Wingcase:       Pheasant Tail – Black
Legs:                Pheasant Tail – Black


Tying Instructions

Early Black Stonefly Nymph Step - 1
Step 1.
Place hook in the vise and wrap a base layer of
thread to above hook barb and then back to toward the eye.

Early Black Stonefly Nymph Step - 2
Step 2.
Select 8-10 strands of pheasant tail dyed black and tie in on top of the hook so the
natural tips of the tail extend about a hook gape’s distance beyond the barb/base layer.
Now wrap thread back towards hook eye and over the shank which becomes the body.


Early Black Stonefly Nymph Step - 3
Step 3.
Tie in the wire on top of the hook at the thorax area. With your fingernail against the wire to keep
the wire from spinning at the tie-in area, wind the wire back towards the tail. Using wire cutters, trim the wire.

Early Black Stonefly Nymph Step - 4

Step 4. Tie in another clump of pheasant tail (or the remainder of the original material) to serve as the wingcase.

Early Black Stonefly Nymph Step - 5
Step 5.
Dub a robust thorax with Ice Dub.

Early Black Stonefly Nymph Step - 6
Step 6.
Pull the pheasant tail fibers over the thorax as the wingcase
and tie down with two or three wraps – DO NOT TRIM excess material.

Early Black Stonefly Nymph Step - 7
Step 7.
Divide the pheasant tail fibers to each side of the hook and wrap them
so they are positioned about 45 degrees angled backwards.

Early Black Stonefly Nymph Step - 8
Step 8.
Trim the fibers, which are now the legs, so they are slightly longer than the thorax. Whip Finish and
apply water based head cement over the thread body and head.  Standard head cements will melt Ice Dub.

Optional Epoxy Head:

Early Black Stonefly Nymph Optional Step 3.5
Step – 3 1/2.
 Between Steps 3 and 4, tie in a piece of  flashabou.

Early Black Stonefly Nymph Optional Step - 7.5
Step – 7 1/2.  
Pull the flashabou over the wingcase, centered and tie off.

Early Black Stonefly Nymph Optional Step 9Early Black Stonefly Nymph Optional Step 9.5


Step – 9. Apply a drop of Loon UV Knot Sense over the thorax and cure with UV light. You can
use 5-minute epoxy or Clear Cure Goo as an alternative to Knot Sense to achieve the same effect.

Print This Page
copper john nymph, fly tying, how to tie stonefly nymph, ice dub, late winter steelhead fishing, manistee river, stone fly, Stonelfy Nymph Pattern
«‹34567›»
Gift Certificate

Gift Certificates

Lessons - Learn to Fly Cast or Improve

Casting Lessons

About Ted Kraimer Fishing Guide

About Your Guide, Ted Kraimer

Guide Trips - Fly Fishing Float Trips

Guide Trips & Pricing

Fish & Seasons

Fall Steelhead Manistee River

Steelhead

Bluegill, Panfish and Bass Fly Fishing on Local Lakes Near Traverse City

Bluegill / Panfish / Bass

Carp Fishing West Grand Traverse Bay

Golden Bones / Carp

Trout Fishing Manistee River near Traverse City Michigan

Trout

King Salmon Fly Fishing - Betsie River Near Traverse City

Salmon

Fly fishing for smallmouth bass Manistee River and Northern Michigan Lakes

Smallmouth Bass

Ted Kraimer • Current Works, LLC • PO Box 333 • Traverse City, Michigan 49685 • (231) 883-8156

© 2024 Current Works, LLC — All rights reserved
  • Home
  • Guide Trips & Pricing
  • Fishing Report
  • Fish & Seasons
  • Rivers & Hatches
  • Fly Tying
  • Articles
  • Gallery
  • About
  • Sitemap